Frigate & Google Coral and Proxmox VM
Bought items:
Good Youtube Tutorial: https://www.youtube.com/watch?v=zKk9dnAp8FM
In Proxmox Node:
lsusbroot@orange:/etc/pve/lxc# lsusb
Bus 008 Device 001: ID 1d6b:0003 Linux Foundation 3.0 root hub
Bus 007 Device 001: ID 1d6b:0002 Linux Foundation 2.0 root hub
Bus 006 Device 001: ID 1d6b:0003 Linux Foundation 3.0 root hub
Bus 005 Device 001: ID 1d6b:0002 Linux Foundation 2.0 root hub
Bus 004 Device 001: ID 1d6b:0003 Linux Foundation 3.0 root hub
Bus 003 Device 001: ID 1d6b:0002 Linux Foundation 2.0 root hub
Bus 002 Device 003: ID 18d1:9302 Google Inc.
Bus 002 Device 001: ID 1d6b:0003 Linux Foundation 3.0 root hub
Bus 001 Device 002: ID 8087:0029 Intel Corp. AX200 Bluetooth
Bus 001 Device 001: ID 1d6b:0002 Linux Foundation 2.0 root hub
Setup Ubuntu VM and Add USB device:
Restart VM
run lsusb to see if the vm has the USB

Install Docker and Portainer
Add this Docker Compose to install frigate
version: "3.9"
services:
  frigate:

    container_name: frigate
    privileged: true # this may not be necessary for all setups
    restart: unless-stopped
    stop_grace_period: 30s # allow enough time to shut down the various services
    image: ghcr.io/blakeblackshear/frigate:stable
    shm_size: "512mb" # update for your cameras based on calculation above
    devices:
      - /dev/bus/usb:/dev/bus/usb # Passes the USB Coral, needs to be modified for other versions
      - /dev/apex_0:/dev/apex_0 # Passes a PCIe Coral, follow driver instructions here https://coral.ai/docs/m2/get-started/#2a-on-linux
      #- /dev/video11:/dev/video11 # For Raspberry Pi 4B
      #- /dev/dri/renderD128:/dev/dri/renderD128 # For intel hwaccel, needs to be updated for your hardware
    volumes:
      - /etc/localtime:/etc/localtime:ro
      - /mnt/portainer2/frigate/config:/config
      - /mnt/portainer2/frigate/storage:/media/frigate
      - type: tmpfs # Optional: 1GB of memory, reduces SSD/SD Card wear
        target: /tmp/cache
        tmpfs:
          size: 1000000000
    ports:
      - "8971:8971"
      - "5000:5000" # Internal unauthenticated access. Expose carefully.
      - "8554:8554" # RTSP feeds
      - "8555:8555/tcp" # WebRTC over tcp
      - "8555:8555/udp" # WebRTC over udp
    environment:
      FRIGATE_RTSP_PASSWORD: "strong@pwd"
go to path VM IP:5000 to view the Frigate UI Configuration Editor

Twist your config like mine:
make sure to change username , password and ip address. Below is the 3 tapo c110 configuration url address
mqtt:
  enabled: false

cameras:
  tapo_username001: # <------ Name the camera
    enabled: true
    ffmpeg:
      inputs:
        - path: rtsp://tapo_username001:yourpassw@192.168.1.xxx:554/stream1 # <----- The stream you want to use for detection
          roles:
            - detect
            - record
    detect:
      enabled: true # <---- disable detection until you have a working camera feed
      width: 2304
      height: 1296
      fps: 5
    motion:
      threshold: 30
      contour_area: 28
      improve_contrast: true
    record:
      enabled: true
      retain:
        days: 30
        mode: motion
    snapshots:
      enabled: true
      timestamp: true
      bounding_box: true
      retain:
        default: 30
  tapo_username002: # <------ Name the camera
    enabled: true
    ffmpeg:
      inputs:
        - path: rtsp://tapo_username002:yourpassw@192.168.1.xxx:554/stream1 # <----- The stream you want to use for detection
          roles:
            - detect
            - record
    detect:
      enabled: true # <---- disable detection until you have a working camera feed
      width: 2304
      height: 1296
      fps: 5
    motion:
      threshold: 30
      contour_area: 28
      improve_contrast: true
    record:
      enabled: true
      retain:
        days: 30
        mode: motion
    snapshots:
      enabled: true
      timestamp: true
      bounding_box: true
      retain:
        default: 30
  tapo_username003: # <------ Name the camera
    enabled: true
    ffmpeg:
      inputs:
        - path: rtsp://tapo_username003:yourpassw@192.168.1.xxx:554/stream1 # <----- The stream you want to use for detection
          roles:
            - detect
            - record
    detect:
      enabled: true # <---- disable detection until you have a working camera feed
      width: 2304
      height: 1296
      fps: 5
    motion:
      threshold: 30
      contour_area: 28
      improve_contrast: true
    record:
      enabled: true
      retain:
        days: 30
        mode: motion
    snapshots:
      enabled: true
      timestamp: true
      bounding_box: true
      retain:
        default: 30


record:
  enabled: true
  retain:
    days: 30
    mode: active_objects
  alerts:
    retain:
      days: 30
      mode: motion
  detections:
    retain:
      days: 30
      mode: motion

detectors:
  coral:
    type: edgetpu
    device: usb

objects:
  track:
    - person
    - face
    - printer
    - toy
    - filament
    - print_bed
    - extruder
    - tool
    - wrench
    - screw
    - spaghetti
    - failed_print


version: 0.15-1
camera_groups:
  SonA1:
    order: 1
    icon: LuFingerprint
    cameras:
      - tapo_username001
      - tapo_username002
      - tapo_username003
Click save and restart button
Tips:
Make sure to disable detection on your tapo settings, disable the local recording ( we don't need to use sd card for storage )
Go to the UI > Settings > Motion Tuner to update the Threshold and Contour Area to match your needs.
If you have google coral, it should have red label around the images.

Well done.
PCI Devices mapping in Proxmox
if you restart your VM or Host, the usb address id could change so that you need to map your host usb into your vm usb. Here is a quick run:
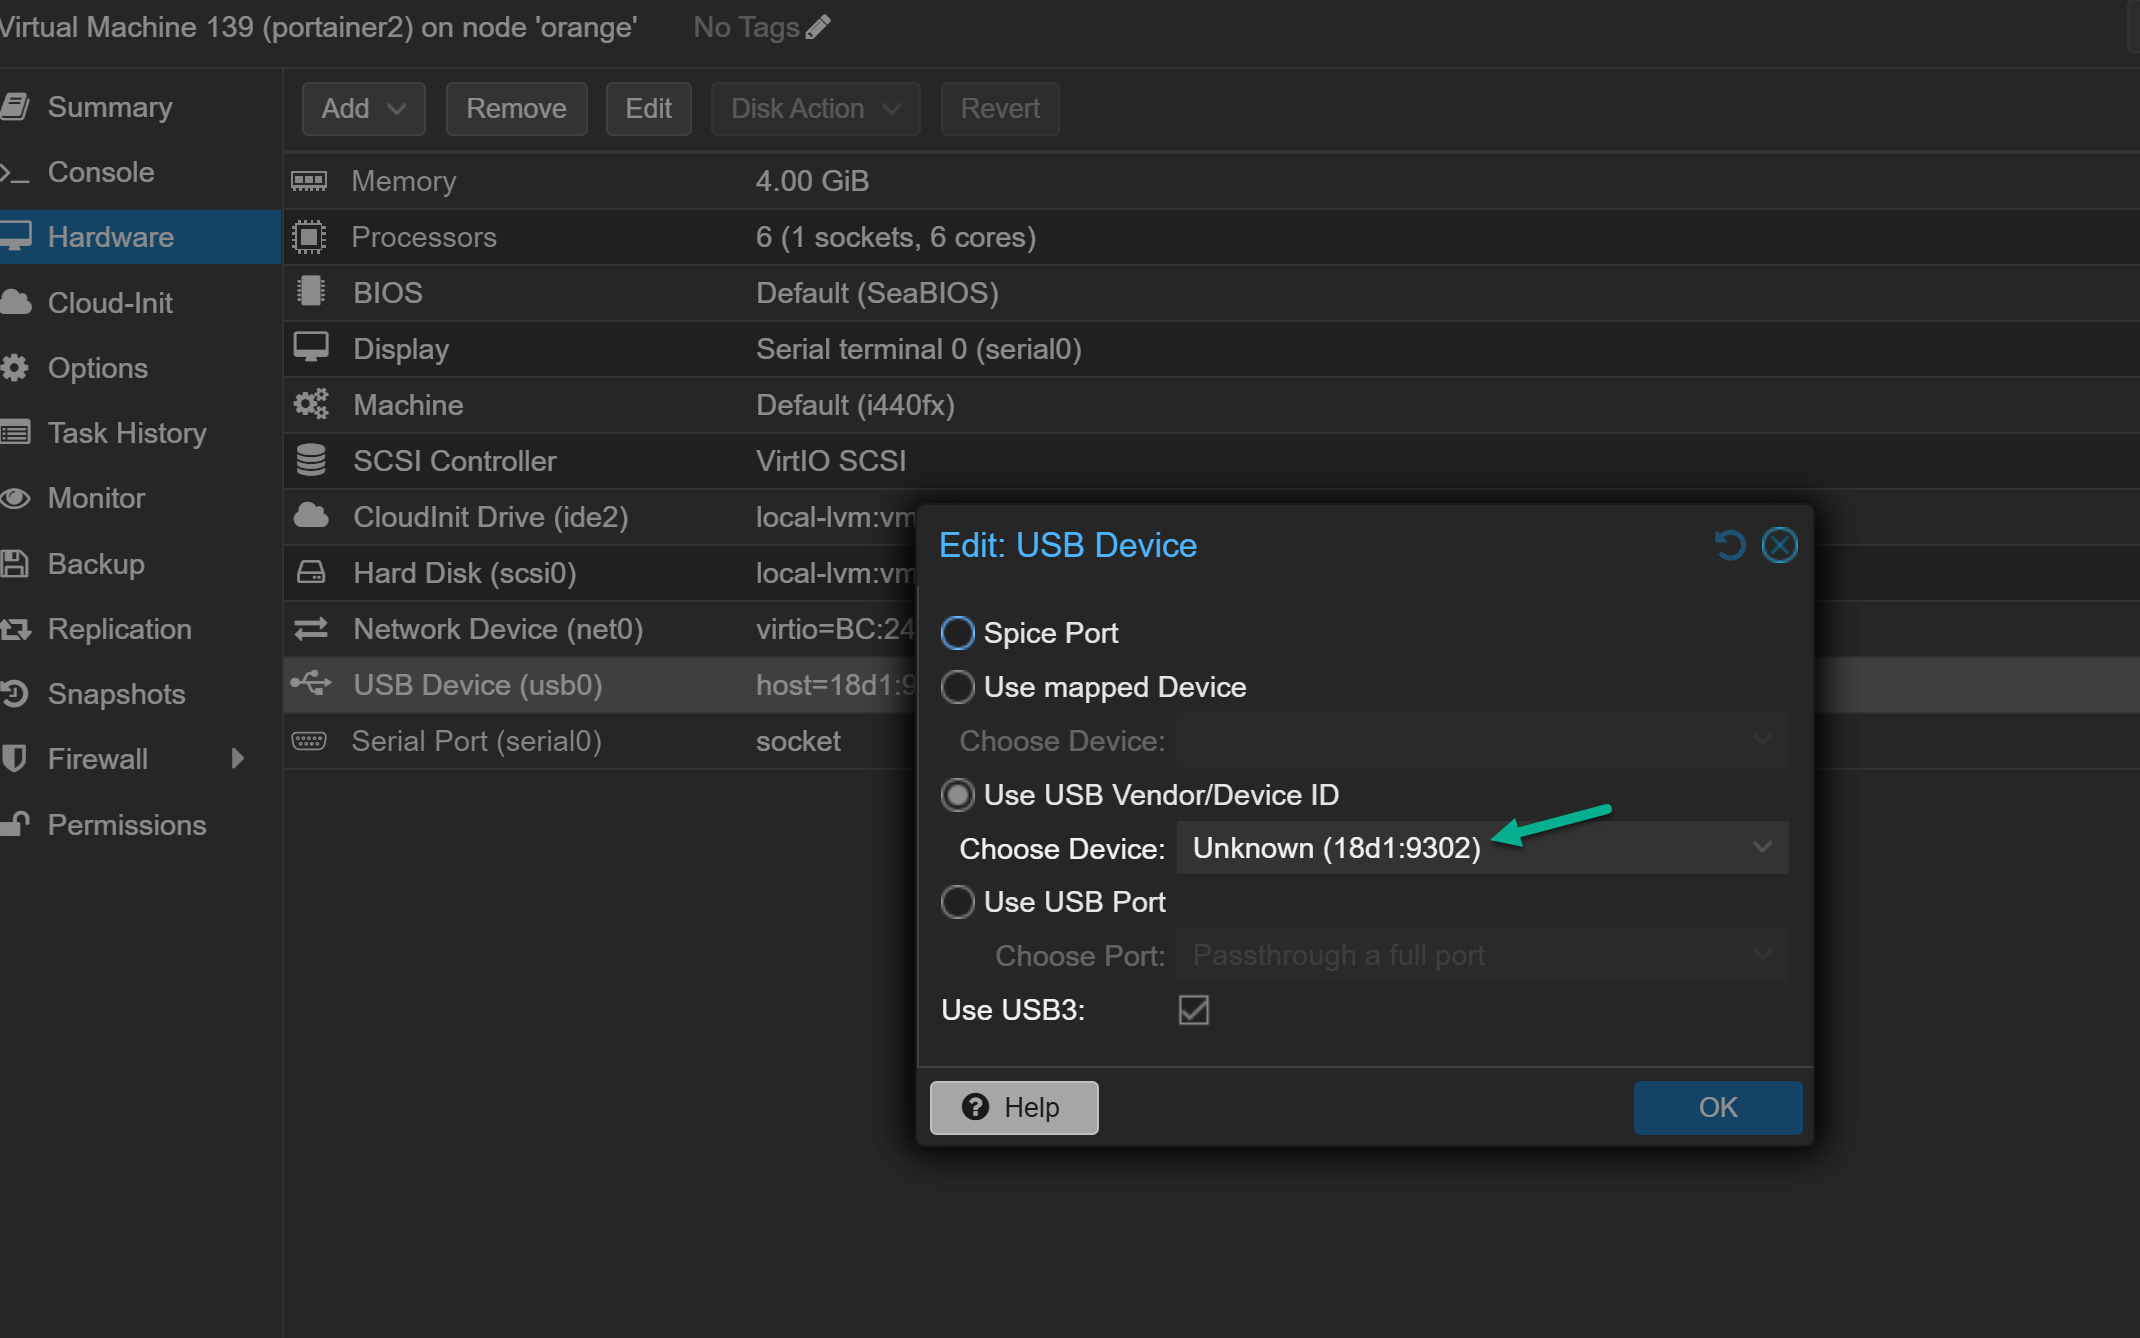
Remove your PCI Device in your VM Hardware setting.
SSH into your host pc which has the coral usb plugged in, mine is Orange
lsusb -t
/: Bus 08.Port 1: Dev 1, Class=root_hub, Driver=xhci_hcd/1p, 10000M
/: Bus 07.Port 1: Dev 1, Class=root_hub, Driver=xhci_hcd/1p, 480M
/: Bus 06.Port 1: Dev 1, Class=root_hub, Driver=xhci_hcd/1p, 10000M
/: Bus 05.Port 1: Dev 1, Class=root_hub, Driver=xhci_hcd/1p, 480M
/: Bus 04.Port 1: Dev 1, Class=root_hub, Driver=xhci_hcd/1p, 10000M
/: Bus 03.Port 1: Dev 1, Class=root_hub, Driver=xhci_hcd/1p, 480M
/: Bus 02.Port 1: Dev 1, Class=root_hub, Driver=xhci_hcd/2p, 10000M
|__ Port 2: Dev 3, If 0, Class=Vendor Specific Class, Driver=usbfs, 5000M << this is the one
/: Bus 01.Port 1: Dev 1, Class=root_hub, Driver=xhci_hcd/5p, 480M
|__ Port 5: Dev 2, If 0, Class=Wireless, Driver=btusb, 12M
|__ Port 5: Dev 2, If 1, Class=Wireless, Driver=btusb, 12M
Bus 02, Port 2 → Driver=xhci_hcd → PCIe USB controller
readlink -f /sys/bus/usb/devices/usb2/sys/devices/pci0000:00/0000:00:08.1/0000:c5:00.3/usb2
PCI address: 0000:c5:00.3
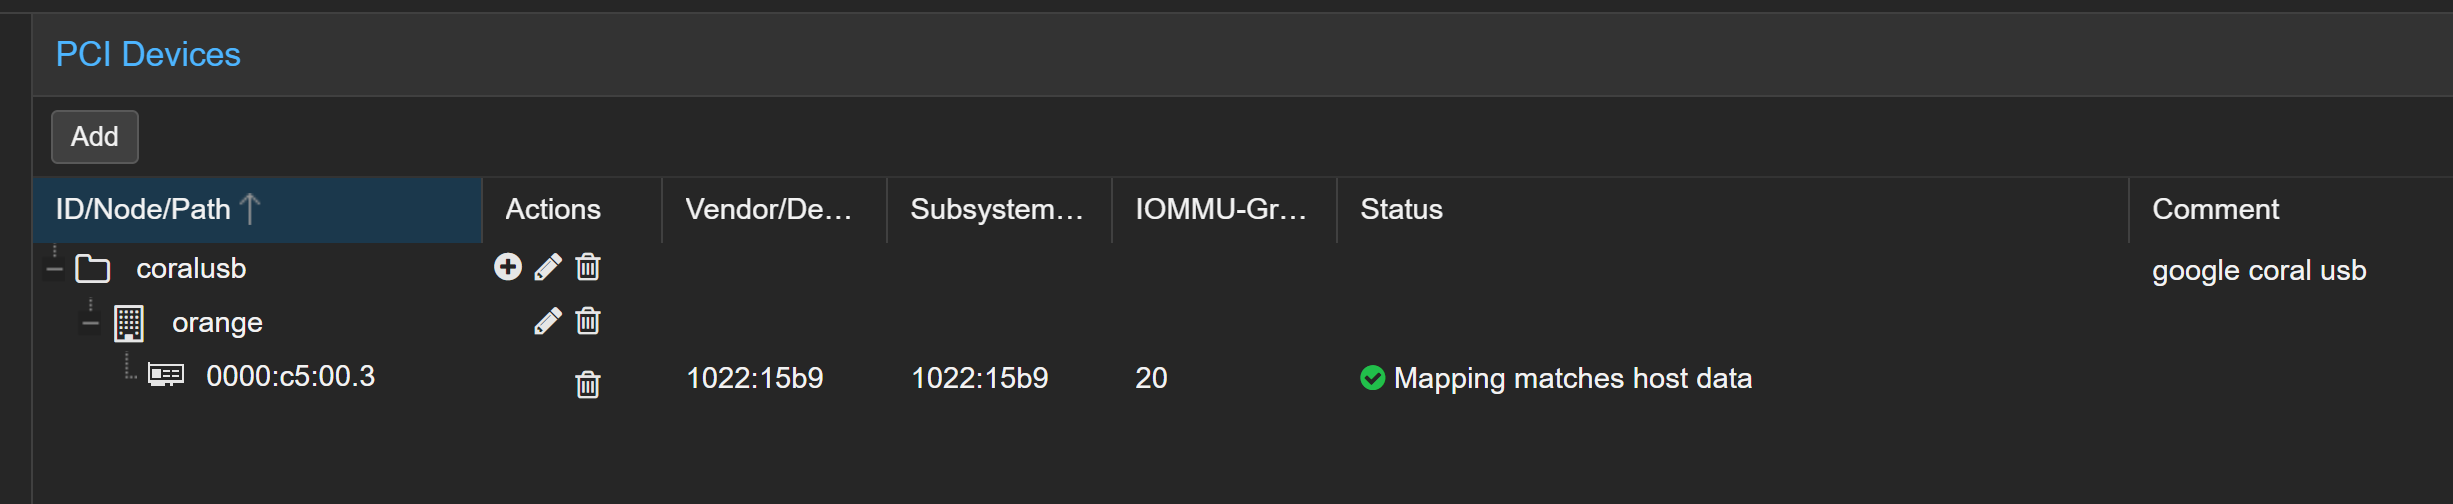
Go to Data Center > Resource Mappings > Under PCI Devices Panel , click Add > Choose Mapping on Node: Orange
Scroll down and pick the id like the above, which is 0000:c5:00.3
give it a short Name: coralusb
click Create
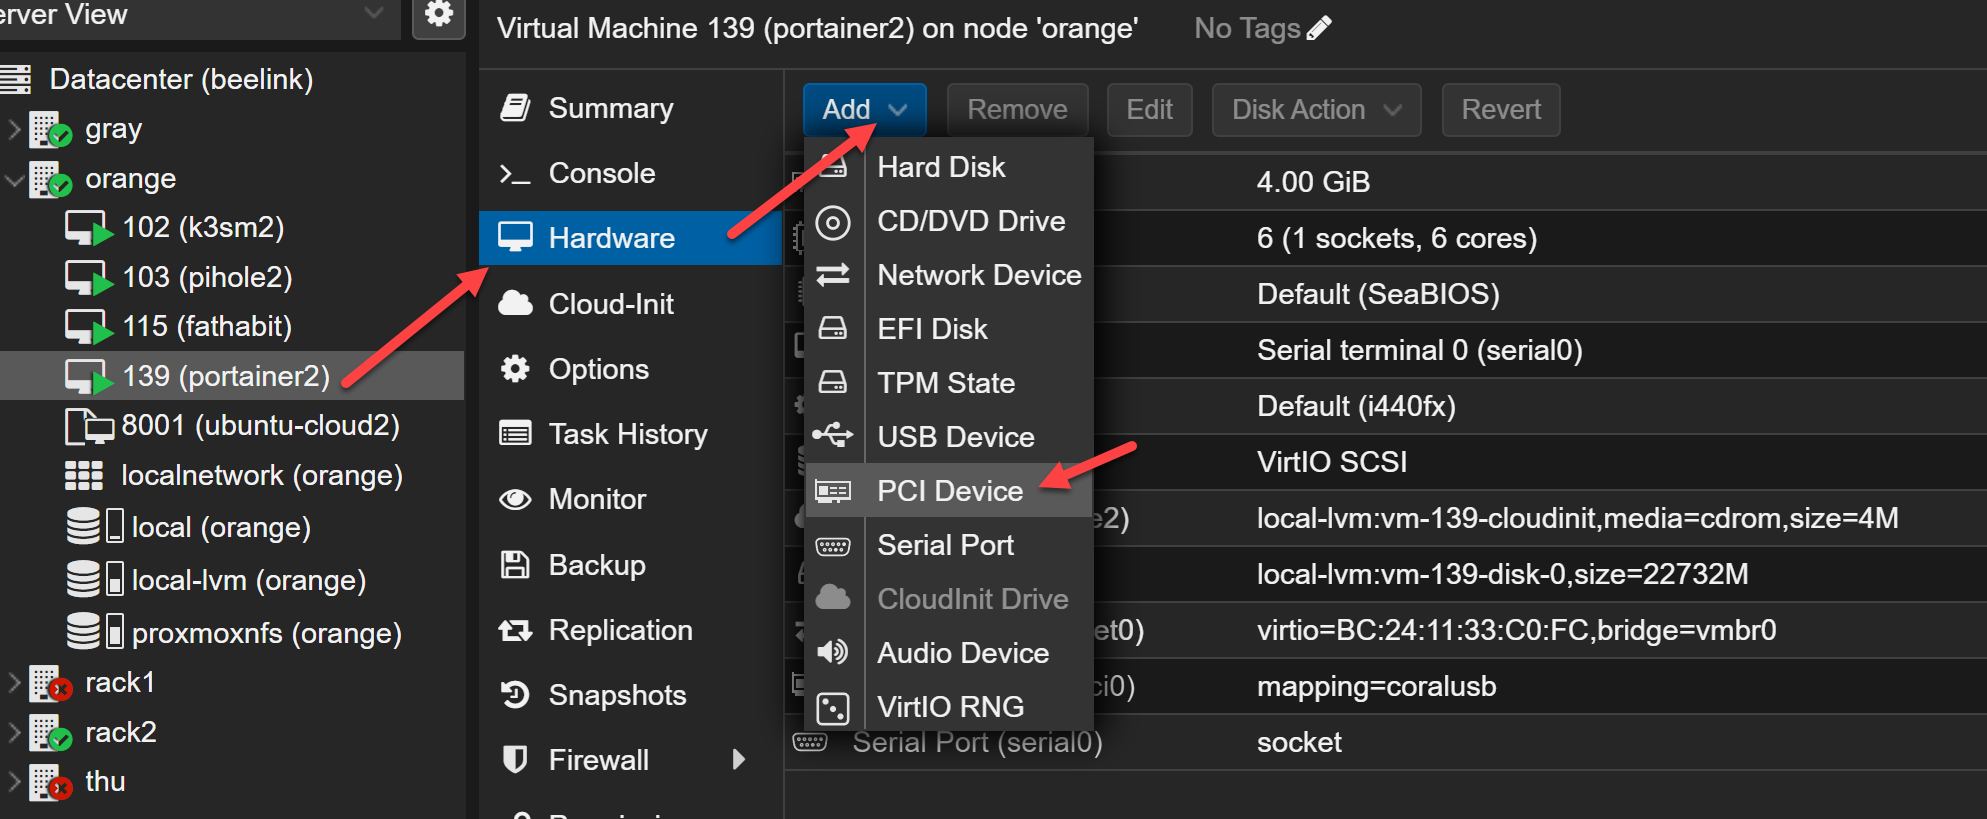
Now go back to your VM and add your pci device into your vm hardware setting:
Pick your mapped device:
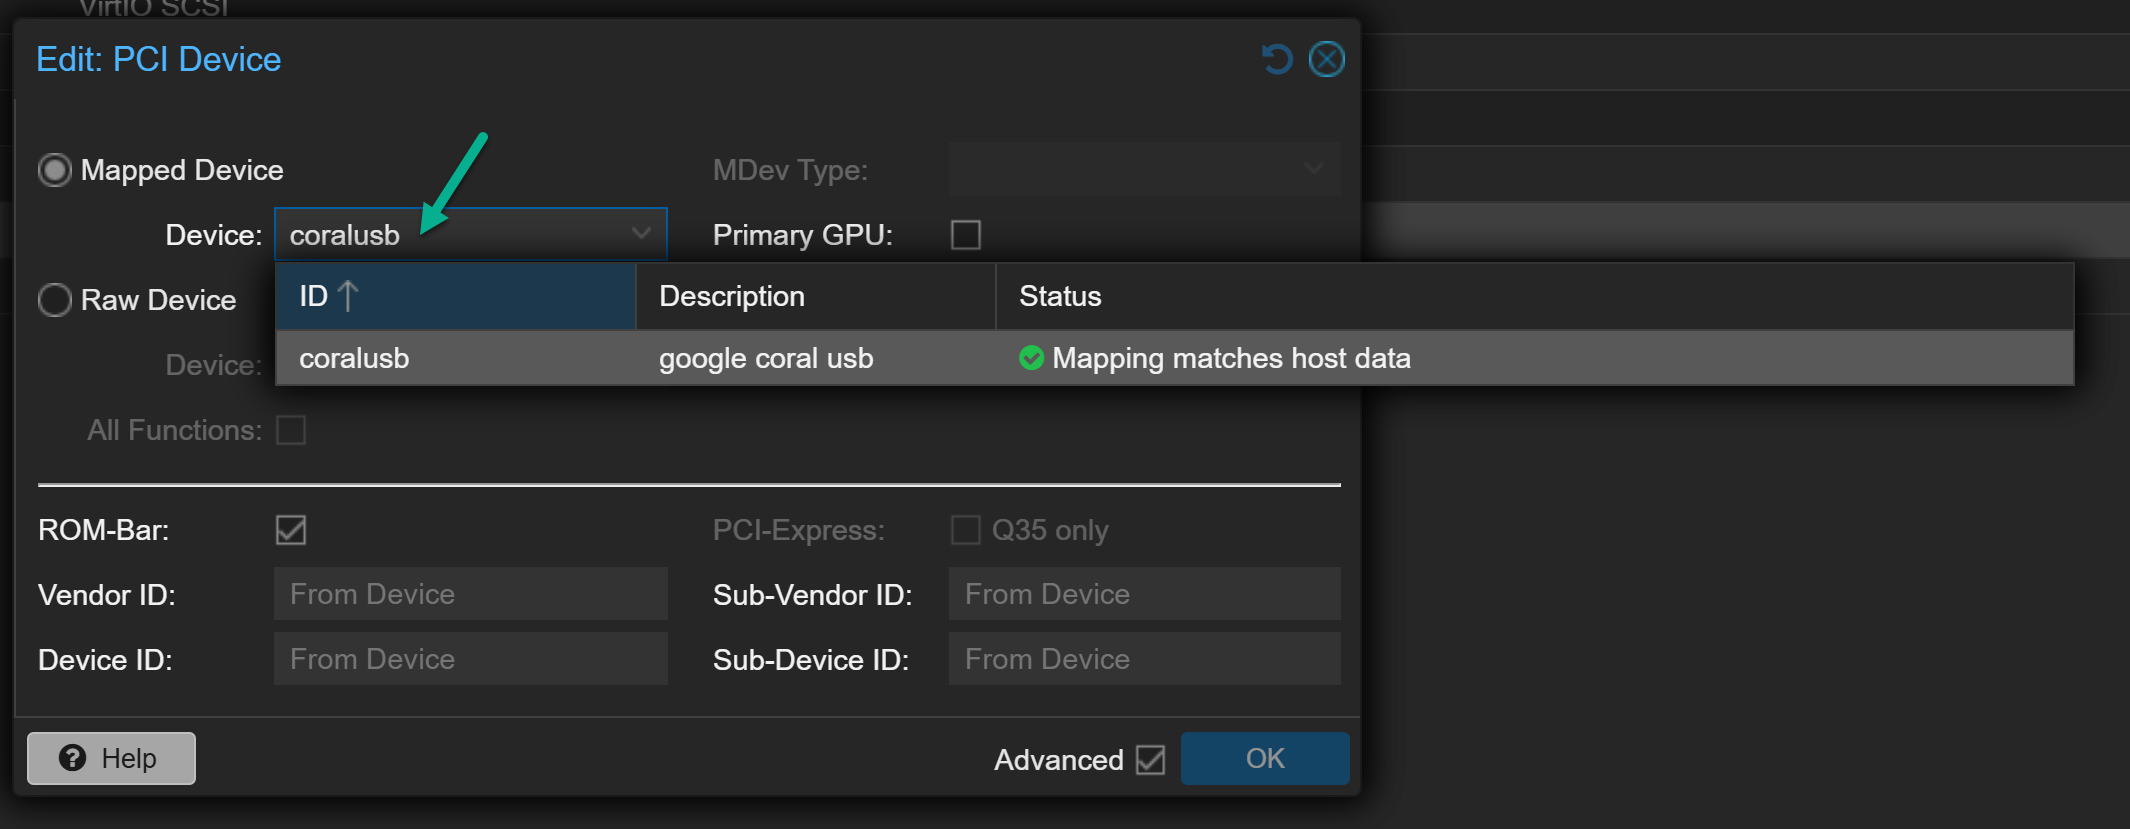
Done. Restart the VM.
Update on 29 May 2025, here is my frigate yaml configuration for both google coral and beelink ser7 gpu. This include go2rtc which will stream one connection to the camera and stream out to everything else.
mqtt:
  enabled: false
go2rtc:
  webrtc:
    candidates:
      - 192.168.1.114:8555
      - portainer2.kyluat.lan:8555
      - frigate:8555
  streams:
    son_user001:
      - rtsp://user001:{FRIGATE_RTSP_PASSWORD}@192.168.1.100:554/stream2
      - tapo://{FRIGATE_TAPO_PASSWORD}@192.168.1.100
      - ffmpeg:son_user001#audio=opus
    son_user001_record:
      - ffmpeg:rtsp://user001:{FRIGATE_RTSP_PASSWORD}@192.168.1.100:554/stream2#video=copy
      - tapo://{FRIGATE_TAPO_PASSWORD}@192.168.1.100

    # son_user001_sub:
    #   - rtsp://user001:{{FRIGATE_RTSP_PASSWORD}}@192.168.1.100:554/stream2?timeout=92&rtsp_transport=tcp#video=copy
    #   - ffmpeg:son_user001#audio=opus
    son_user002:
      - rtsp://user002:{FRIGATE_RTSP_PASSWORD}@192.168.1.101:554/stream2
      - tapo://{FRIGATE_TAPO_PASSWORD}@192.168.1.101
      - ffmpeg:son_user002#audio=opus
    son_user002_record:
      - ffmpeg:rtsp://user002:{FRIGATE_RTSP_PASSWORD}@192.168.1.101:554/stream2#video=copy
      - tapo://{FRIGATE_TAPO_PASSWORD}@192.168.1.101
    # son_user002_sub:
    #   - rtsp://user002:{{FRIGATE_RTSP_PASSWORD}}@192.168.1.101:554/stream2?timeout=92&rtsp_transport=tcp#video=copy
    #   - ffmpeg:son_user002_sub#audio=opus
    son_user003:
      - rtsp://user003:{FRIGATE_RTSP_PASSWORD}@192.168.1.102:554/stream2
      - tapo://{FRIGATE_TAPO_PASSWORD}@192.168.1.102
      - ffmpeg:son_user003#audio=opus
    son_user003_record:
      - ffmpeg:rtsp://user003:{FRIGATE_RTSP_PASSWORD}@192.168.1.102:554/stream2#video=copy
      - tapo://{FRIGATE_TAPO_PASSWORD}@192.168.1.102

    # son_user003_sub:
    #   - rtsp://user003:{{FRIGATE_RTSP_PASSWORD}}@192.168.1.102:554/stream2?timeout=92&rtsp_transport=tcp#video=copy
    #   - ffmpeg:son_user003_sub#audio=opus
    # son_user004:
    #   - rtsp://admin:{FRIGATE_TAPO_PASSWORD}@192.168.1.190:554/cam/realmonitor?channel=1&subtype=0#video=copy
    son_user004:
      - rtsp://admin:{FRIGATE_TAPO_PASSWORD}@192.168.1.190:554/cam/realmonitor?channel=1&subtype=1#video=copy
      - ffmpeg:son_user004_sub#audio=opus
    # son_user005:
    #   - rtsp://admin:{FRIGATE_TAPO_PASSWORD}@192.168.1.181:554/cam/realmonitor?channel=1&subtype=0#video=copy
    son_user005:
      - rtsp://admin:{FRIGATE_TAPO_PASSWORD}@192.168.1.181:554/cam/realmonitor?channel=1&subtype=1#video=copy
      - ffmpeg:son_user005_sub#audio=opus
    # son_user006:
    #   - rtsp://admin:{FRIGATE_TAPO_PASSWORD}@192.168.1.182:554/cam/realmonitor?channel=1&subtype=0#video=copy # L2C67C0F
    son_user006:
      - rtsp://admin:{FRIGATE_TAPO_PASSWORD}@192.168.1.182:554/cam/realmonitor?channel=1&subtype=1#video=copy # L2C67C0F
      - ffmpeg:son_user006_sub#audio=opus

cameras:
  son_user004: # <------ Name the camera
    enabled: true
    ffmpeg:
      output_args:
        record: preset-record-generic-audio-aac
      inputs:
        - path: rtsp://127.0.0.1:8554/son_user004 # <----- The stream you want to use for detection
          input_args: preset-rtsp-restream
          roles:
            - record
        # - path: rtsp://127.0.0.1:8554/son_user004_sub # <----- The stream you want to use for detection
        #   input_args: preset-rtsp-restream
        #   roles:
            - detect
            - audio

    detect:
      enabled: true # <---- disable detection until you have a working camera feed
      fps: 5
    motion:
      threshold: 80
      contour_area: 100
      improve_contrast: false
    snapshots:
      enabled: true
      timestamp: true
      bounding_box: true
      retain:
        default: 90
    zones:
      person_zone:
        coordinates: 0.997,0.902,0.255,0.746,0.322,0.009,0.77,0.004,0.68,0.191,0.996,0.071
        loitering_time: 0
    birdseye:
      order: 1
    review:
      detections:
        required_zones: person_zone
      alerts:
        required_zones: person_zone
    objects: {}
  son_user005: # <------ Name the camera
    enabled: true
    ffmpeg:
      output_args:
        record: preset-record-generic-audio-aac
      inputs:
        - path: rtsp://127.0.0.1:8554/son_user005 # <----- The stream you want to use for detection
          input_args: preset-rtsp-restream
          roles:
            - record
        # - path: rtsp://127.0.0.1:8554/son_user005_sub # <----- The stream you want to use for detection
        #   input_args: preset-rtsp-restream
        #   roles:
            - detect
            - audio
    detect:
      enabled: true # <---- disable detection until you have a working camera feed
      fps: 5
    motion:
      threshold: 34
      contour_area: 43
      improve_contrast: false
    snapshots:
      enabled: true
      timestamp: true
      bounding_box: true
      retain:
        default: 90
    zones:
      person_zone:
        coordinates: 0.229,0.03,0.217,1,0.415,0.991,0.96,0.957,0.982,0.004
        loitering_time: 0
        inertia: 3
    birdseye:
      order: 1
    review:
      alerts:
        required_zones: person_zone
      detections:
        required_zones: person_zone
    objects: {}
  son_user006: # <------ Name the camera
    enabled: true
    ffmpeg:
      output_args:
        record: preset-record-generic-audio-aac
      inputs:
        - path: rtsp://127.0.0.1:8554/son_user006 # <----- The stream you want to use for detection
          input_args: preset-rtsp-restream
          roles:
            - record
        # - path: rtsp://127.0.0.1:8554/son_user006_sub # <----- The stream you want to use for detection
        #   input_args: preset-rtsp-restream
        #   roles:
            - detect
            - audio

    detect:
      enabled: true # <---- disable detection until you have a working camera feed
      fps: 5
    motion:
      threshold: 80
      contour_area: 100
      improve_contrast: true
      mask: 0.614,0.276,0.605,0.598,0.726,0.617,0.724,0.28
    snapshots:
      enabled: true
      timestamp: true
      bounding_box: true
      retain:
        default: 90
    zones:
      person_zone:
        coordinates: 0.099,0.257,0.1,0.997,1,1,1,0.29
        loitering_time: 0
    birdseye:
      order: 1
    review:
      alerts:
        required_zones: person_zone
      detections:
        required_zones: person_zone
    objects:
      mask: 0.727,0.219,0.725,0.392,0.914,0.41,0.896,0.207
  son_user001: # <------ Name the camera
    enabled: true
    ffmpeg:
      output_args:
        record: preset-record-generic-audio-aac
      inputs:
        - path: rtsp://127.0.0.1:8554/son_user001_record # <----- The stream you want to use for record
          input_args: preset-rtsp-restream
          roles:
            - record
        - path: rtsp://127.0.0.1:8554/son_user001 # <----- The stream you want to use for detect
          input_args: preset-rtsp-restream
          roles:
            - detect
            - audio
    record:
      enabled: true
      retain:
        days: 90       # Keep recordings for 7 days (adjust as needed)
        mode: all     # Options: motion | active_objects | all
    detect:
      enabled: true # <---- disable detection until you have a working camera feed
      fps: 5
    motion:
      threshold: 80
      contour_area: 100
      improve_contrast: true
    snapshots:
      enabled: true
      timestamp: true
      bounding_box: true
      retain:
        default: 90
    zones:
      plate:
        coordinates:
          0.269,0,0.276,0.29,0,0.568,0.145,1,0.404,1,0.896,1,1,0.583,0.943,0.413,0.803,0.297,0.795,0
        loitering_time: 0
        inertia: 3
    birdseye:
      order: 1
    review:
      detections:
        required_zones: plate
      alerts:
        required_zones: plate
    objects: {}
  son_user002: # <------ Name the camera
    enabled: true
    ffmpeg:
      output_args:
        record: preset-record-generic-audio-aac
      inputs:
        - path: rtsp://127.0.0.1:8554/son_user002_record # <----- The stream you want to use for detection
          input_args: preset-rtsp-restream
          roles:
            - record
        - path: rtsp://127.0.0.1:8554/son_user002 # <----- The stream you want to use for detection
          input_args: preset-rtsp-restream
          roles:
            - detect
            - audio
    record:
      enabled: true
      retain:
        days: 90       # Keep recordings for 7 days (adjust as needed)
        mode: all     # Options: motion | active_objects | all
    detect:
      enabled: true # <---- disable detection until you have a working camera feed
      fps: 5
    motion:
      threshold: 80
      contour_area: 100
      improve_contrast: false
      mask:
        - 0,0,0.442,0,0.463,0.456,0.165,0.544,0,0.84
        - 0.667,0,0.675,0.274,0.999,0.399,0.998,0
    snapshots:
      enabled: true
      timestamp: true
      bounding_box: true
      retain:
        default: 90
    zones:
      plate:
        coordinates:
          0.163,0.551,0.462,0.458,0.444,0.003,0.664,0,0.674,0.276,0.998,0.399,1,0.996,0,0.996,0.001,0.851
        loitering_time: 0
    birdseye:
      order: 2
    review:
      detections:
        required_zones: plate
      alerts:
        required_zones: plate
    objects: {}
  son_user003: # <------ Name the camera
    enabled: true
    ffmpeg:
      output_args:
        record: preset-record-generic-audio-aac
      inputs:
        - path: rtsp://127.0.0.1:8554/son_user003_record # <----- The stream you want to use for detection
          input_args: preset-rtsp-restream
          roles:
            - record
        - path: rtsp://127.0.0.1:8554/son_user003 # <----- The stream you want to use for detection
          input_args: preset-rtsp-restream
          roles:
            - detect
            - audio
    record:
      enabled: true
      retain:
        days: 90       # Keep recordings for 7 days (adjust as needed)
        mode: all     # Options: motion | active_objects | all
    detect:
      #enabled: false # <---- disable detection until you have a working camera feed
      fps: 5
    motion:
      threshold: 30
      contour_area: 10
      improve_contrast: true
      mask: 0.362,0.172,0.359,0.421,0.457,0.421,0.459,0.222
    snapshots:
      enabled: true
      timestamp: true
      bounding_box: true
      retain:
        default: 30
    zones:
      person_zone:
        coordinates:
          0.467,0.087,0.606,0.078,0.613,0.332,0.89,0.109,1,0.106,0.999,0.997,0.001,0.999,0.005,0.047,0.23,0.117,0.337,0.599,0.457,0.421
        loitering_time: 0
        objects: person
        inertia: 3
    birdseye:
      order: 3
    review:
      alerts:
        required_zones: person_zone
      detections:
        required_zones: person_zone
    objects:
      mask: 0.472,0.542,0.48,0.013,0.541,0.013,0.524,0.52
record:
  enabled: true
  export:
    timelapse_args: -vf setpts=PTS/60 -r 25
  sync_recordings: true
  retain:
    days: 90
    mode: all
  alerts:
    retain:
      days: 90
      mode: motion
  detections:
    retain:
      days: 90
      mode: motion

detectors:
  coral:
    type: edgetpu
    device: usb

objects:
  track:
    - person
    - cat
    - dog

audio:
  enabled: false
  listen:
    - bark
    - fire_alarm
    - scream
    - speech
    - yell
    - dog
    - footsteps
    - laughter
    - pets
    - cat
    - meow
    - electric_piano
    - piano
    - telephone
    - television


birdseye:
  enabled: true
  width: 1280
  height: 720
  mode: continuous
  inactivity_threshold: 15
  layout:
    max_cameras: 6
    scaling_factor: 1.0


ffmpeg:
  hwaccel_args: preset-vaapi
  output_args:
    record: preset-record-generic-audio-aac


version: 0.16-0
camera_groups:
  SonA1:
    order: 1
    icon: LuFingerprint
    cameras:
      - son_user001
      - son_user002
      - son_user003
      - son_user004
      - son_user005
      - son_user006
  Bird:
    order: 2
    icon: LuBird
    cameras: birdseye
semantic_search:
  enabled: true
  reindex: false
  model_size: large
detect:
  enabled: true
face_recognition:
  enabled: true
  model_size: large
lpr:
  enabled: true
classification:
  bird:
    enabled: true
Firewall and Allow Ports for Dahua Cam:
When you first init setup your dahua cam, don't use pi hole dns, use 1.1.1.1 dns instead.
1.device that integrates only the P2P function.
To use UDP hole punch technology for remote access, the firewall output of the device must allow the following ports:
● UDP ports: 0-65535
● TCP ports: 9116, 9118, 12366, 12367
● Dahua servers use dynamic IP addresses, their domain names and functions are:
| Domain Name | Function |
| easy4ipcloud.com | Device login and registration |
| easy4ip.com | Device login and registration |
2.Device supporting P2P and Cloud Business
To use UDP hole punch technology for remote access and normal operation of video surveillance services, the firewall output of the device must allow the following ports:
● UDP ports: 0-65535
● TCP ports: 443, 9112, 9113, 9116, 9118, 10000, 12367, 15100, 15101, 15301, 15600, 15900, 16759
● Dahua servers use dynamic IP addresses, their domain names and functions are:
| Domain Name | Function |
| easy4ipcloud.com | Device login and registration |
| easy4ip.com | Device login and registration |
| dms.easy4ipcloud.com | Device login and registration |
| paas-dms-edge-fk.easy4ipcloud.com | Device login and registration |
| smartdeviceproxy-edge-fk.easy4ipcloud.com | Device login and registration |
| devaccess.easyipcloud.com | Device login and registration |
| dus.easy4ipcloud.com | Cloud upgrade of device firmware |
| aktualisieren.easy4ip.com | Cloud upgrade of device firmware |
| update.easyviewercloud.com | Cloud upgrade of device firmware |
| vrs.easy4ipcloud.com | Upload device images and videos |
| pps.easy4ipcloud.com | Upload device messages |
| das.easy4ipcloud.com | Upload device messages |
| das-fk.easy4ipcloud.com | Upload device messages |
| devicelogserver-fk.easy4ipcloud.com | Uploading device log |
No comments to display
No comments to display