PiHole + Wifi + WOL + Shutdown
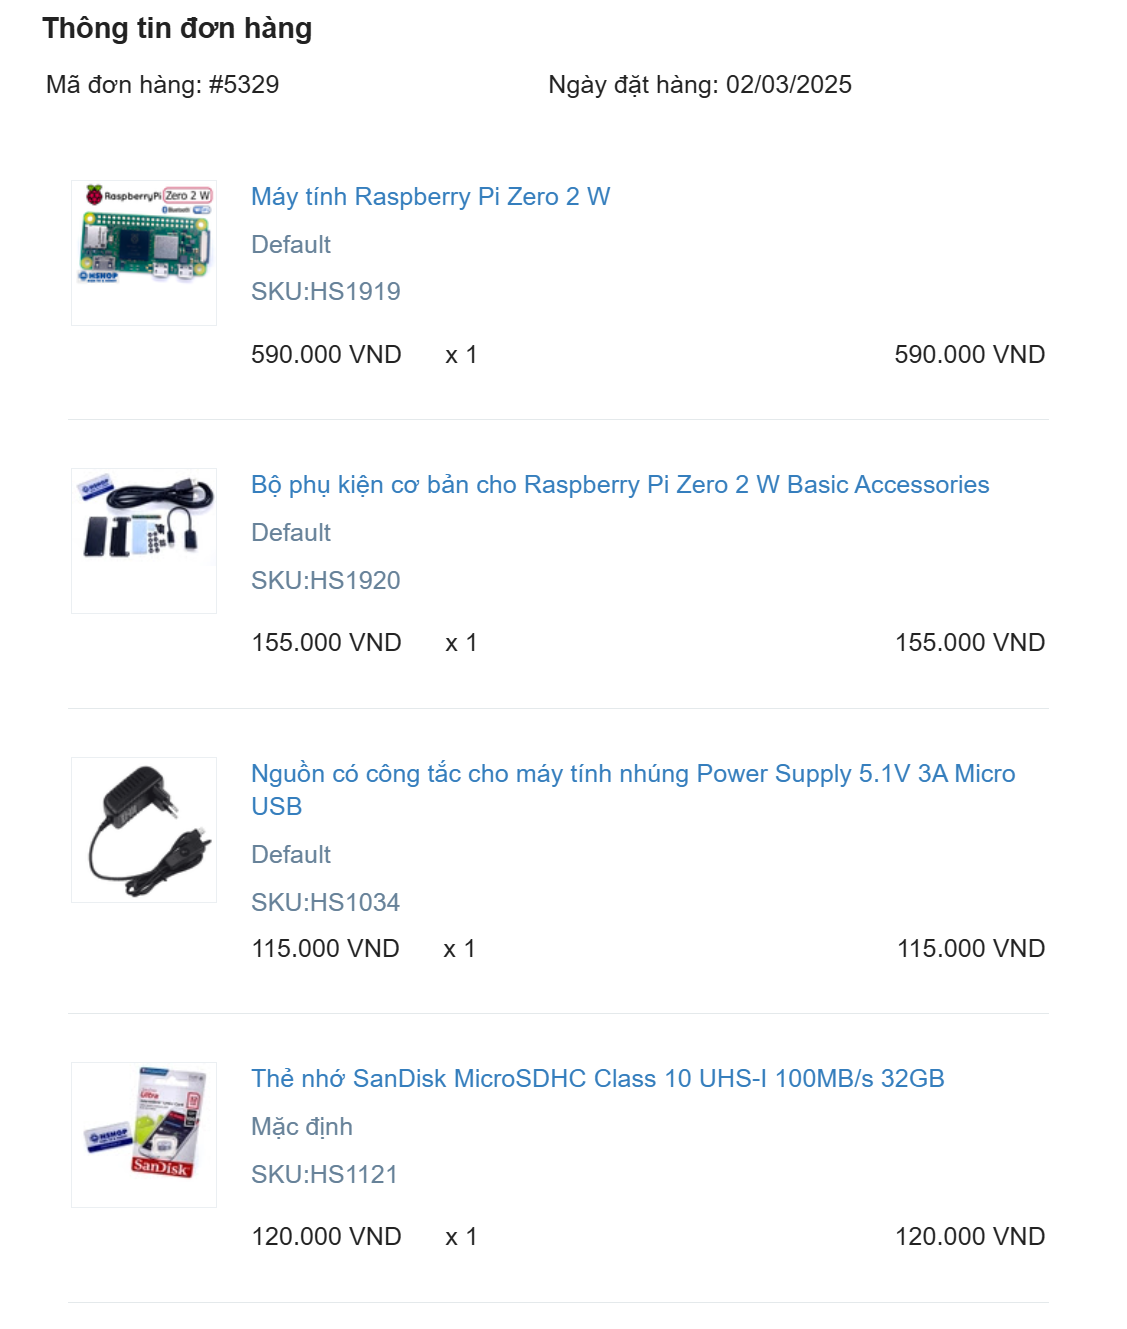
Phụ kiện: https://hshop.vn/bo-phu-kien-co-ban-cho-raspberry-pi-zero-2-w-basic-accessories/
Nguồn Zin: https://go.kyluat.com/nF7yY
Thẻ nhớ: https://go.kyluat.com/oGLNS
Màn hình thì khỏi vì chả bao giờ nhìn. Ở nhà bạn thì cần có bluetooth keyboard và mouse bluetooth nếu có.
Tổng thiệt hại: 980k cho lần đầu, lần sau thì mua rẻ hơn và có sẵn mấy cái nguồn, dây nhợi để cài đặt rồi. việc còn lại cho nó chạy và ssh / VNC vào thôi
Đầu tiên thì cứ múc vài linh kiện cơ bản để bắt đầu. Sau khi mua xong thì mình nghĩ lần sau mình mua thì mình sẽ loại bỏ mấy cái dây nhợ như mini hdmi to hdmi, vỏ nhôm heatsink vì cũng giảm cỡ 10 độ. 40 cái pin vì cũng ko cần =]].
Cài đặt:
Pihole
NUT Server
Setup KeepAlive cho Secondary DNS cho Pihole để dự phòng việc tắt tất cả servers
Test thử trường hợp cúp điện -> UPS bật -> script tắt tất cả hệ thống đúng để không ảnh hưởng database và các k3s nodes
Khi có lại nguồn điện thì script tự động wake tất cả máy và vm, tự động mở lại các nodes và phần mềm.
1. Cài Đặt Pi OS xong thì sẽ cần phải chỉnh static ip với wlan0
Cách 1: Sử dụng command nmcli để đổi ip address của wifi ip
sudo nmcli c show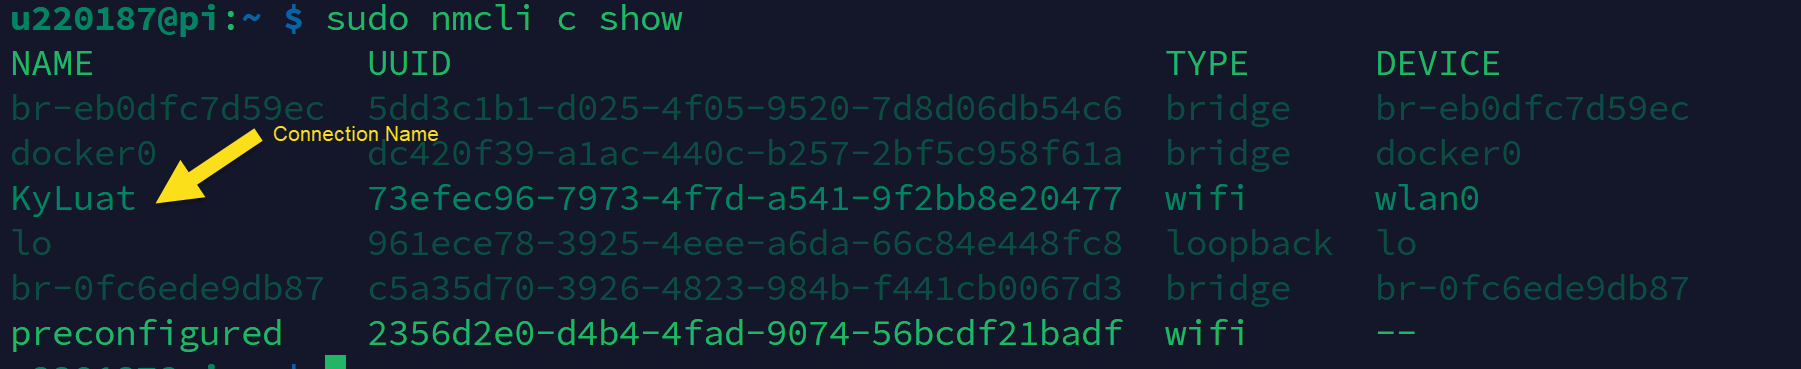
sudo nmcli c mod KyLuat ipv4.addresses 192.168.1.7/24 ipv4.method manual
sudo reboot
Cách 2: Sử dụng NetworkManager TUI tool
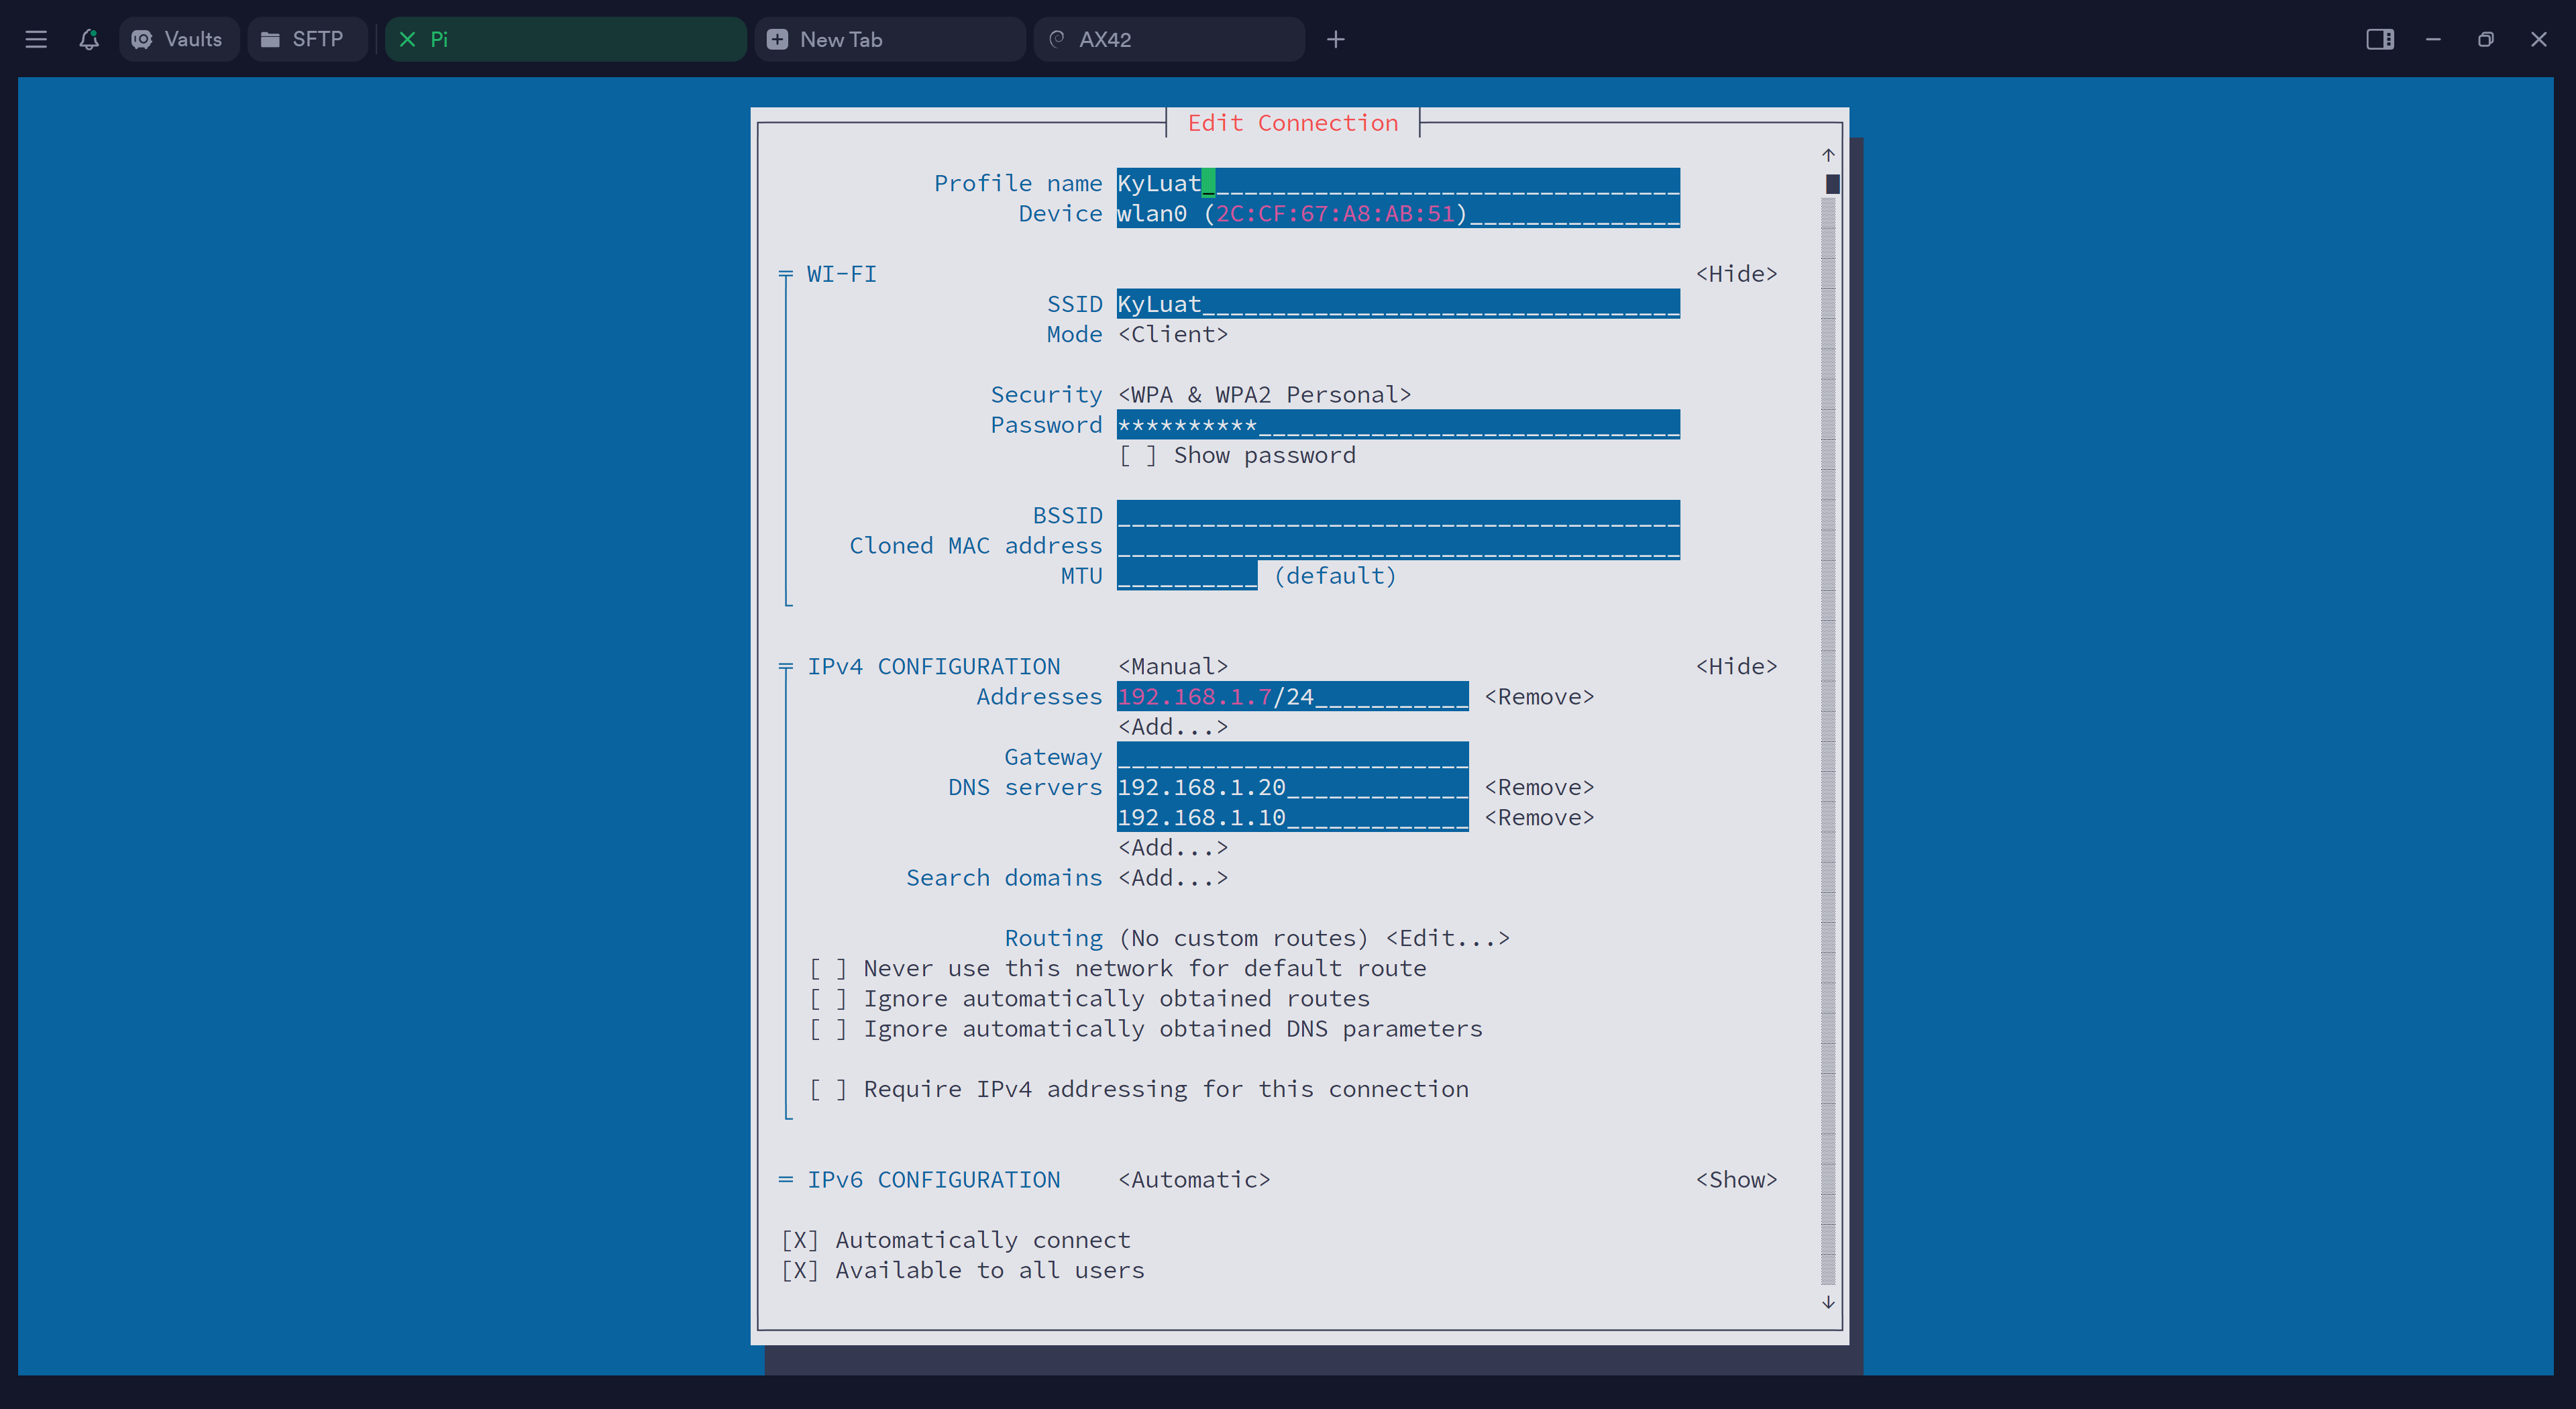
NetworkManager's tool
sudo nmtui2. Setup Docker và Portainer
Tham khảo trên trang docker để install docker: https://docs.docker.com/engine/install/raspberry-pi-os/
Tham khảo trên trang này để install portainer: https://pimylifeup.com/raspberry-pi-portainer/

3. UpsnapDocker configPi Hole as Backup Pi Hole
Cài đặt pi hole lên portainer:
sshPortainer stack / Docker Compose Yaml:
# More info at https://github.com/pi-hole/docker-pi-hole/ and https://docs.pi-hole.net/
services:
  pihole:
    container_name: pihole
    image: pihole/pihole:2023.05.2
    ports:
      # DNS Ports
      - "53:53/tcp"
      - "53:53/udp"
      # Default HTTP Port
      - "80:80/tcp"
      # Default HTTPs Port. FTL will generate a self-signed certificate
      - "443:443/tcp"
      # Uncomment the line below if you are using Pi-hole as your DHCP server
      #- "67:67/udp"
      # Uncomment the line below if you are using Pi-hole as your NTP server
      #- "123:123/udp"
    environment:
      # Set the appropriate timezone for your location (https://en.wikipedia.org/wiki/List_of_tz_database_time_zones), e.g:
      TZ: 'Asia/Ho_Chi_Minh'
      # Set a password to access the web interface. Not setting one will result in a random password being assigned
      FTLCONF_webserver_api_password: 'anythingispossible'
      # If using Docker's default `bridge` network setting the dns listening mode should be set to 'all'
      FTLCONF_dns_listeningMode: 'all'
    # Volumes store your data between container upgrades
    volumes:
      # For persisting Pi-hole's databases and common configuration file
      - './etc-pihole:/etc/pihole'
      # Uncomment the below if you have custom dnsmasq config files that you want to persist. Not needed for most starting fresh with Pi-hole v6. If you're upgrading from v5 you and have used this directory before, you should keep it enabled for the first v6 container start to allow for a complete migration. It can be removed afterwards. Needs environment variable FTLCONF_misc_etc_dnsmasq_d: 'true'
      #- './etc-dnsmasq.d:/etc/dnsmasq.d'

    cap_add:
      # See https://github.com/pi-hole/docker-pi-hole#note-on-capabilities
      # Required if you are using Pi-hole as your DHCP server, else not needed
      - NET_ADMIN
      # Required if you are using Pi-hole as your NTP client to be able to set the host's system time
      - SYS_TIME
      # Optional, if Pi-hole should get some more processing time
      - SYS_NICE
    restart: unless-stopped
Cài đặt keepalive trên master pihole và xàibackup commandpihole:
sudo đểapt xemupdate
ipsudo vàapt macinstall addresskeepalived
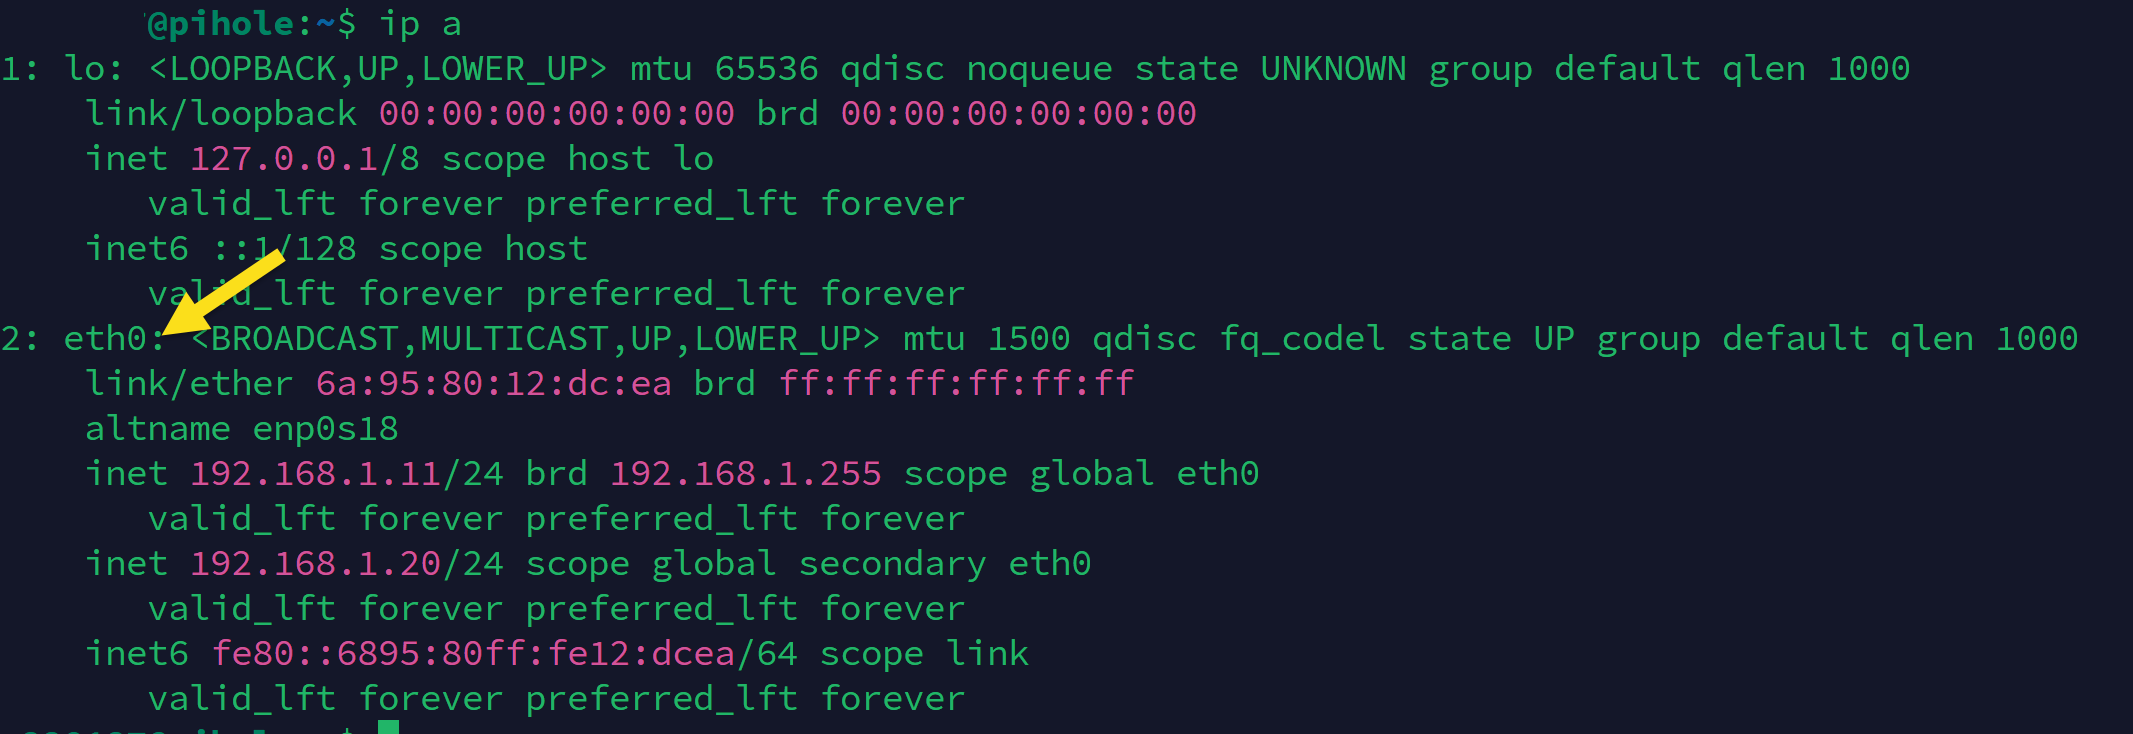
sudo apt install libipset13Xác định interface của network:
ip a tạossh commandvào đểmaster rebootpihole machine và đánh ip a vào sẽ thấy eth0 là interface.
sshpasssudo nano /etc/keepalived/keepalived.confcopy & paste nội dung sau vào notepad và chỉnh sửa interface và ip address, password 8 ký tự.
Master:
vrrp_instance VI_1 {
  state MASTER
  interface eth0
  virtual_router_id 55
  priority 150
  advert_int 1
  unicast_src_ip 192.168.1.2
  unicast_peer {
    192.168.1.3
  }

  authentication {
    auth_type PASS
    auth_pass KyLuatTT
  }

  virtual_ipaddress {
    192.168.1.20/24
  }
}
Giải thích:
  unicast_peer {
    192.168.1.3
    192.168.1.4
}Backup Node keepalive.conf
vrrp_instance VI_1 {
  state BACKUP
  interface eth0
  virtual_router_id 55
  priority 100
  advert_int 1
  unicast_src_ip 192.168.1.3
  unicast_peer {
    192.168.1.2
  }

  authentication {
    auth_type PASS
    auth_pass KyLuatTT
  }

  virtual_ipaddress {
    192.168.1.20/24
  }
}
Enable service cho keepalive chạy mỗi khi os startup ( đánh trên master và backup node )
sudo systemctl enable -p-now ABCPWDkeepalived.servicexem -ostatus "StrictHostKeyChecking=no"backup root@192.168.1.xxxhay "master:
sudo reboot"systemctl status keepalived.serviceThử command tắt service trên master node coi có chuyển qua backup node không:
sudo systemctl stop keepalived.service