Programming
Tất cả về programming language
- GraphQL Apollo Federation Gateway With Subscription Websocket?
- Windows WSL + Ubuntu + Docker+ Node / Nestjs App không vào được
- Cài Đặt WSL2 trên windows 10, không nên xài docker desktop mà nên cài thẳng lên ubuntu
- The Crypto Wallet Tracker
- ENOENT: PS, Spawn PS - Common Issues when Working with Nestjs, Nodejs and Docker
- VSCode Debug Nestjs and Docker Environment
- Nestjs , Docker and Prisma Common Problem when built
- Simple Image to Text using Langchain, Ollama, LM studio Apis
- Install Docker on First Ubuntu
- NextJS + NestJS
- What is OhMyUsd About?
GraphQL Apollo Federation Gateway With Subscription Websocket?
What i use: NestJS + Graphql Apollo Federation + Websocket + Microservices + React + Proxies Forward
- The Problems
- Graphql Apollo Federation old version doesn't support websocket
- Different manipulation of execution context types: http (like express), graphql (graphql apollo), rpc (websocket)
- The Solution
- Setup another instance of Graphql Module for websocket
- The setup
- Create another Graphql Websocket Module Endpoint
- SetupProxies for React Front End Ap
Hôm nay lười quá vì mới solve một số vấn đề WSL2, Docker, Nodejs App không expose được port 3000 để đọc trên local dev máy mình đang vừa học vừa dev. Vì thế mình để tạm một số solution cho bạn nào cần và tìm hiểu thêm nhé.
https://cloud.kyluat.com/s/E2mMa4yJWXBXJ3p

GraphQLModule.forRootAsync<ApolloDriverConfig>({
driver: ApolloDriver,
useFactory: async (authClient: AuthClientsService) => ({
autoSchemaFile: false,
cors: true,
playground: false,
path: '/api/graphql-normal',
typePaths: ['./**/*.graphql'],
installSubscriptionHandlers: true,
subscriptions: {
'graphql-ws': {
path: '/api/ws/graphql',
onConnect: async (context: any) => {
try {
const request = context.extra?.request;
const jwt =
getJwtFromCookie(request?.headers?.cookie) ||
getJwtFromAuthorization(context.connectionParams);
if (!jwt) {
throw new UnprocessableEntityException(
'onConnect: JWT not found',
);
}
if (!authClient)
throw new RpcException('Error onConnect: AuthClientsService');
const user = await authClient.authenticate(jwt);
context.user = user;
} catch (err) {
new Logger().error(err);
throw new UnauthorizedException('Error onConnect');
}
},
},
},
}),
imports: [AuthClientsModule],
inject: [AuthClientsService],
}),
GraphQLModule.forRootAsync<ApolloFederationDriverConfig>({
driver: ApolloFederationDriver,
useFactory: async (configService: ConfigService) => ({
path: '/api/graphql',
playground: true,
cors: true,
autoSchemaFile: {
federation: 2,
},
cache: new InMemoryLRUCache({
// MB
maxSize:
Math.pow(2, 20) *
parseInt(configService.get('APOLLO_MEMORY_CACHE_MB')),
// 5 minutes (in seconds)
// convert string to int
ttl: parseInt(configService.get('APOLLO_MEMORY_CACHE_TTL_SEC')),
}),
plugins: [
ApolloServerPluginCacheControl({
defaultMaxAge: 60,
}),
],
}),
inject: [ConfigService],
}),Vấn đề là do thằng apollo federation nó commercialize vụ websocket với apollo cloud của nó nên nó restrict lại không support cho apollo federation có websocket.
Cách giải quyết là tạo một module graphql khác với driver bình thường nhưng type thì y chang thằng graphql federation.
Mình download schema graphql từ federation rồi save vào project folder dành diêng cho graphql module driver bình thường, đồng thời mình cũng đổi luôn url (path: '/api/graphql-normal',) , lẫn tắt luôn playground, ...

Sau khi setup xong hết thì bên frontend cần subscribe với endpoint websocket như trên ws://URL.COM/api/ws/graphql
Còn dạng REST apollo federation server thì cứ vào end: http://URL.COM/api/graphql

Windows WSL + Ubuntu + Docker+ Node / Nestjs App không vào được
Vấn đề: Không thể truy cập được localhost với port đã thiết lập trên app là 3000
Những vấn đề bạn có thể gặp phải:
- Performance khi xài project trên local /c/project_abc thì sẽ chậm gấp 10 lần so với performance chạy trên wsl ubuntu, tương tự với docker compose cũng thế, nếu xài trên windows docker compose sẽ mất 60s ( quá chậm ), còn nếu trên ubuntu compose thì chỉ còn 3-10s.
- Trên máy ảo ubuntu của wsl không truy cập internet được -> setup dns
- WSL tự động tái lập file nameserver của chính nó /etc/resolve.conf và điền vào nameserver của wsl đó 172.x.x.x
- Docker daemon chưa được thiết lập với DNS của bạn ví dụ: 192.168.1.11 hay của cloudflare 1.1.1.1
Firewall
Vấn đề firewall thì bạn cần phải set allow app, allow directory, allow in và out rules cho firewall
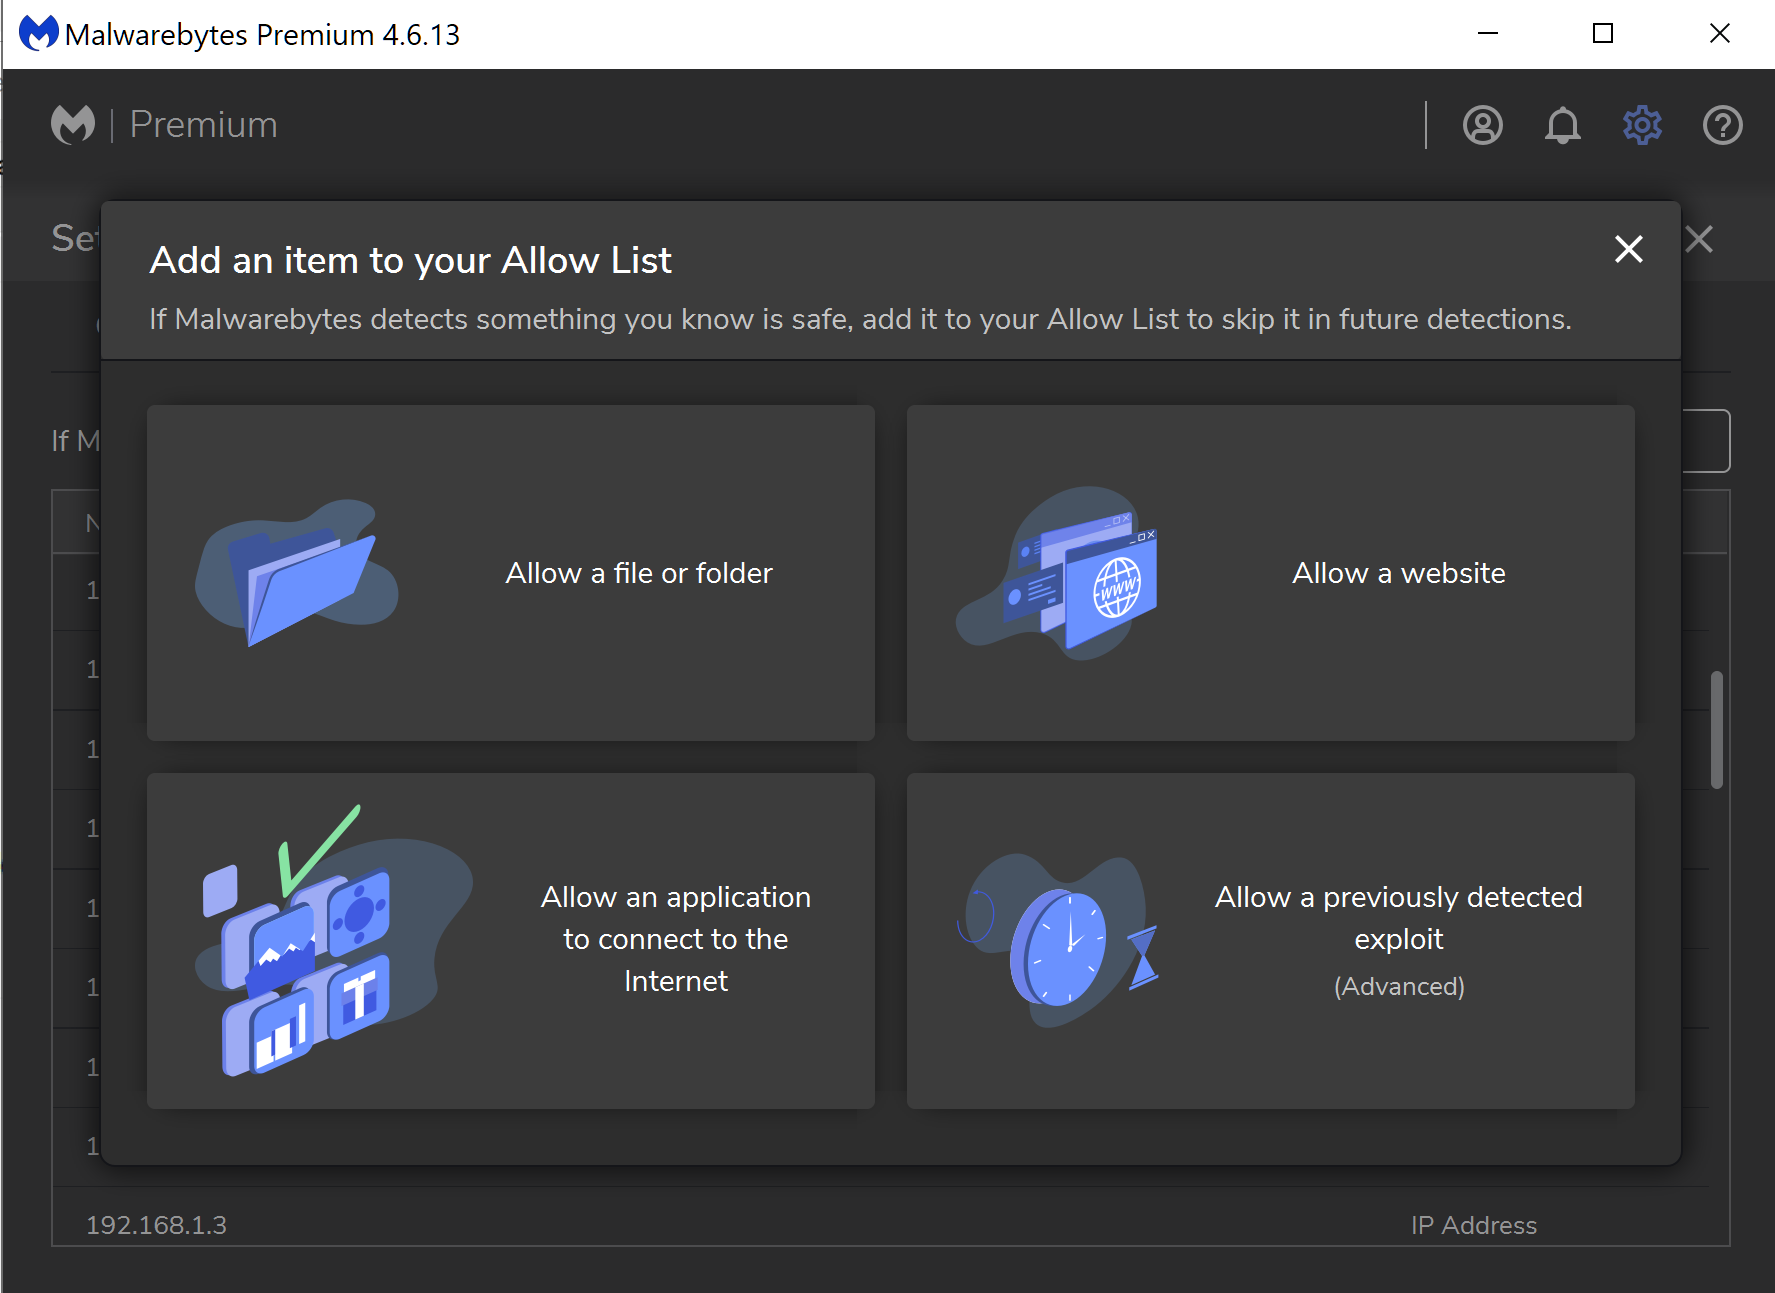
- Mình xài malwarebytes nên mình add allowlist cho các folder như Webstorm, WSL Project Path
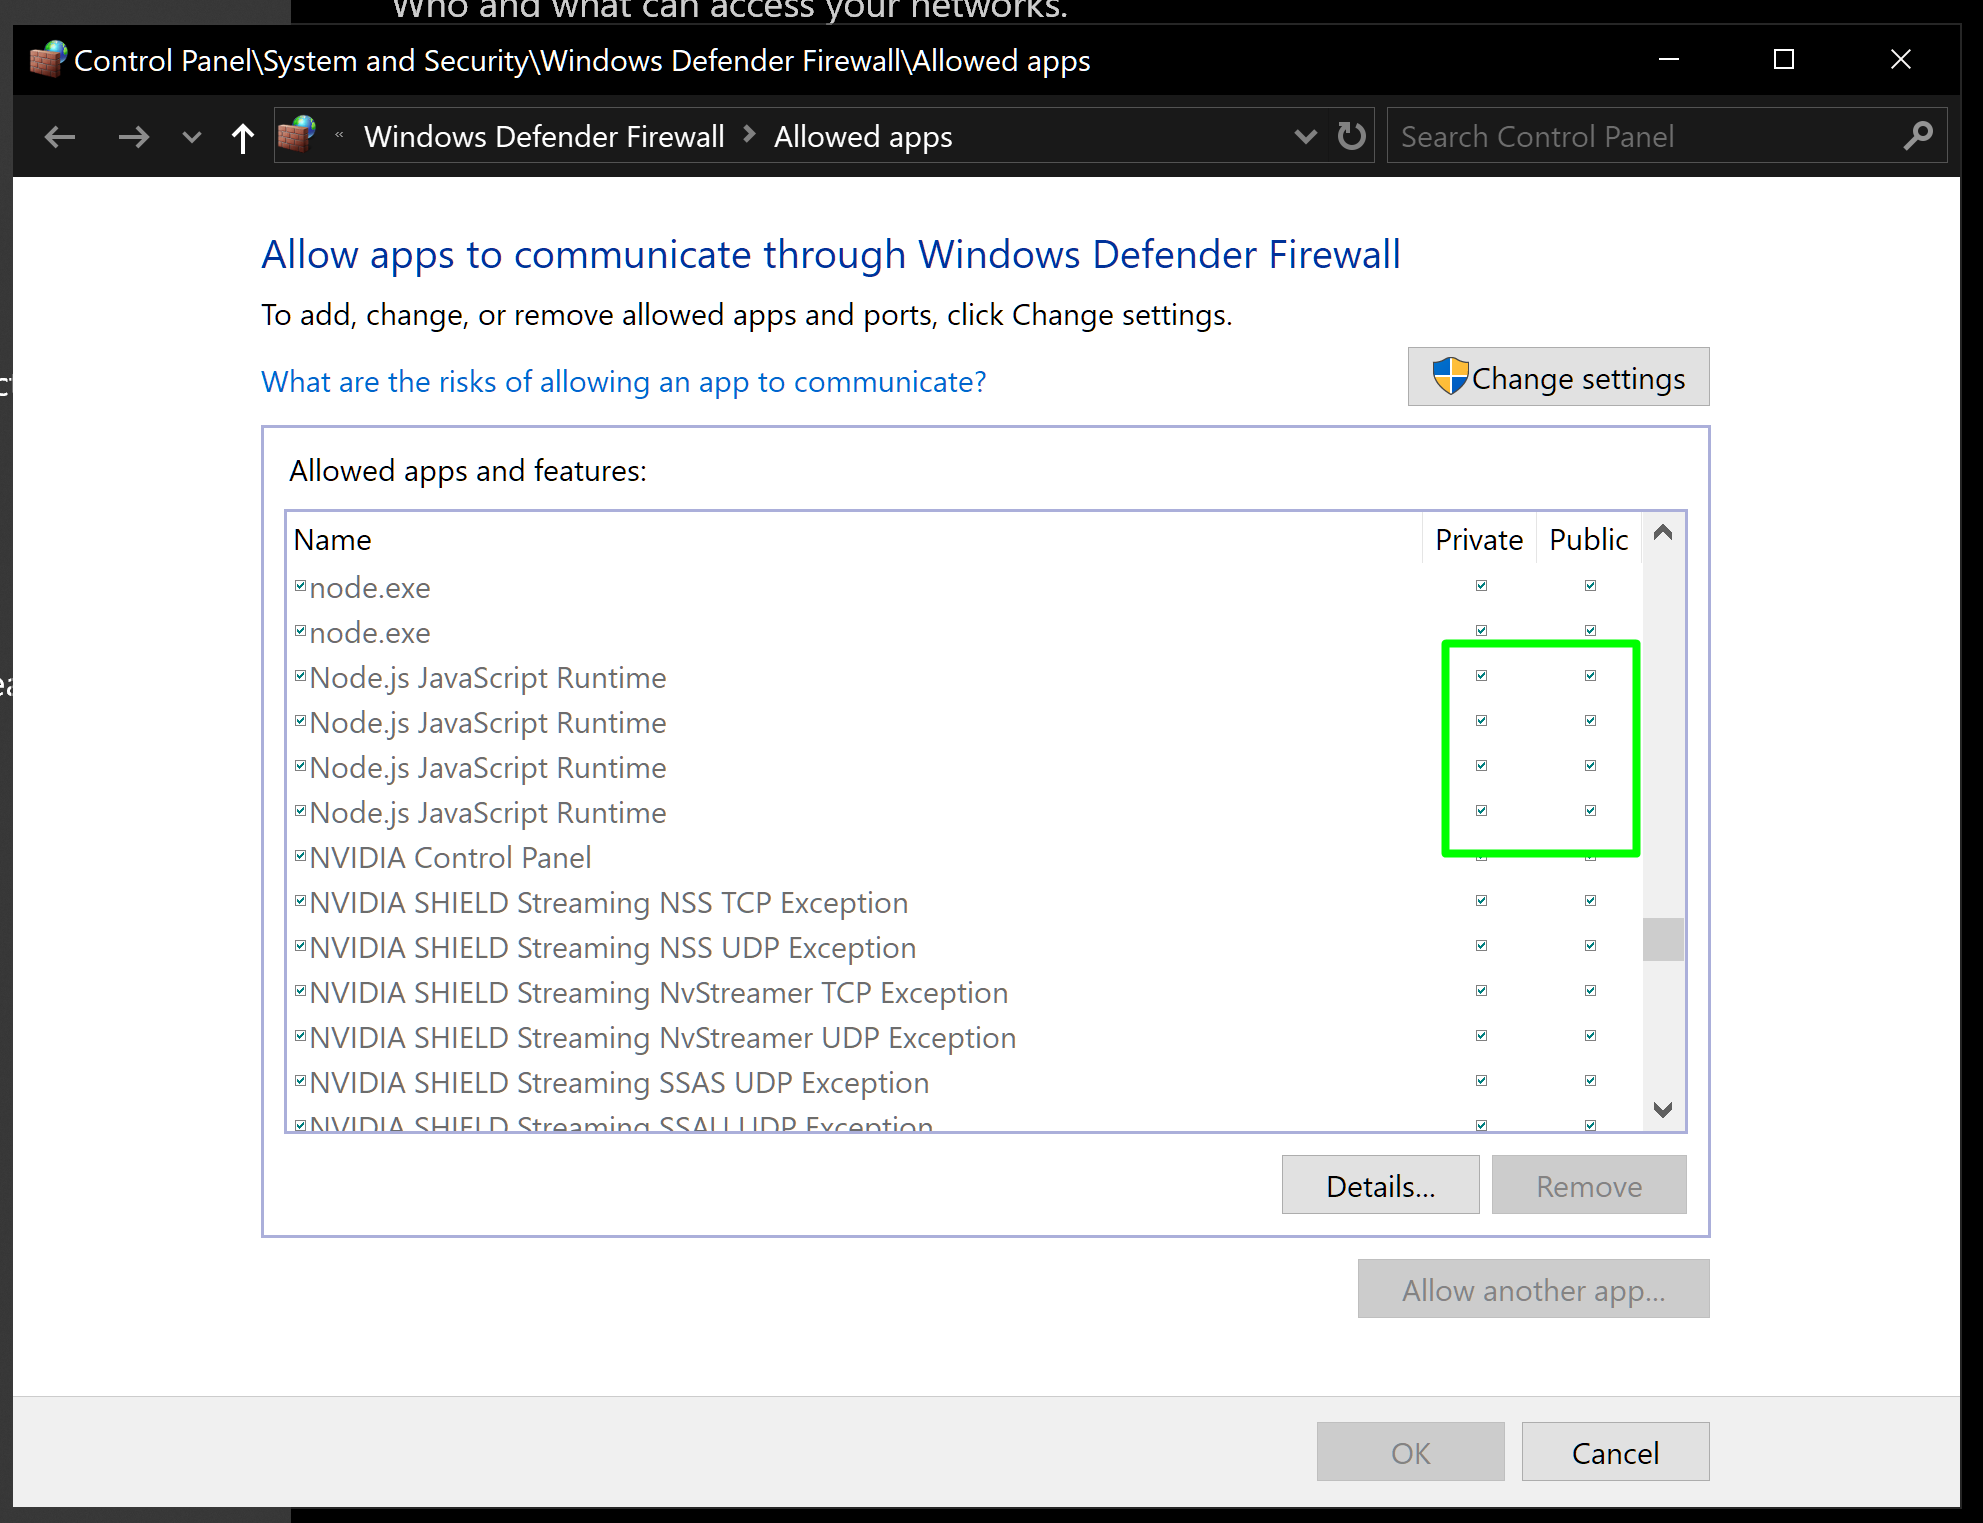
- Ngoài ra mình còn vào windows defender firewall -> Allowed apps -> allow tất cả các app như node.exe, webstorm64.exe, ... ( check cả hai Private + Public boxes )
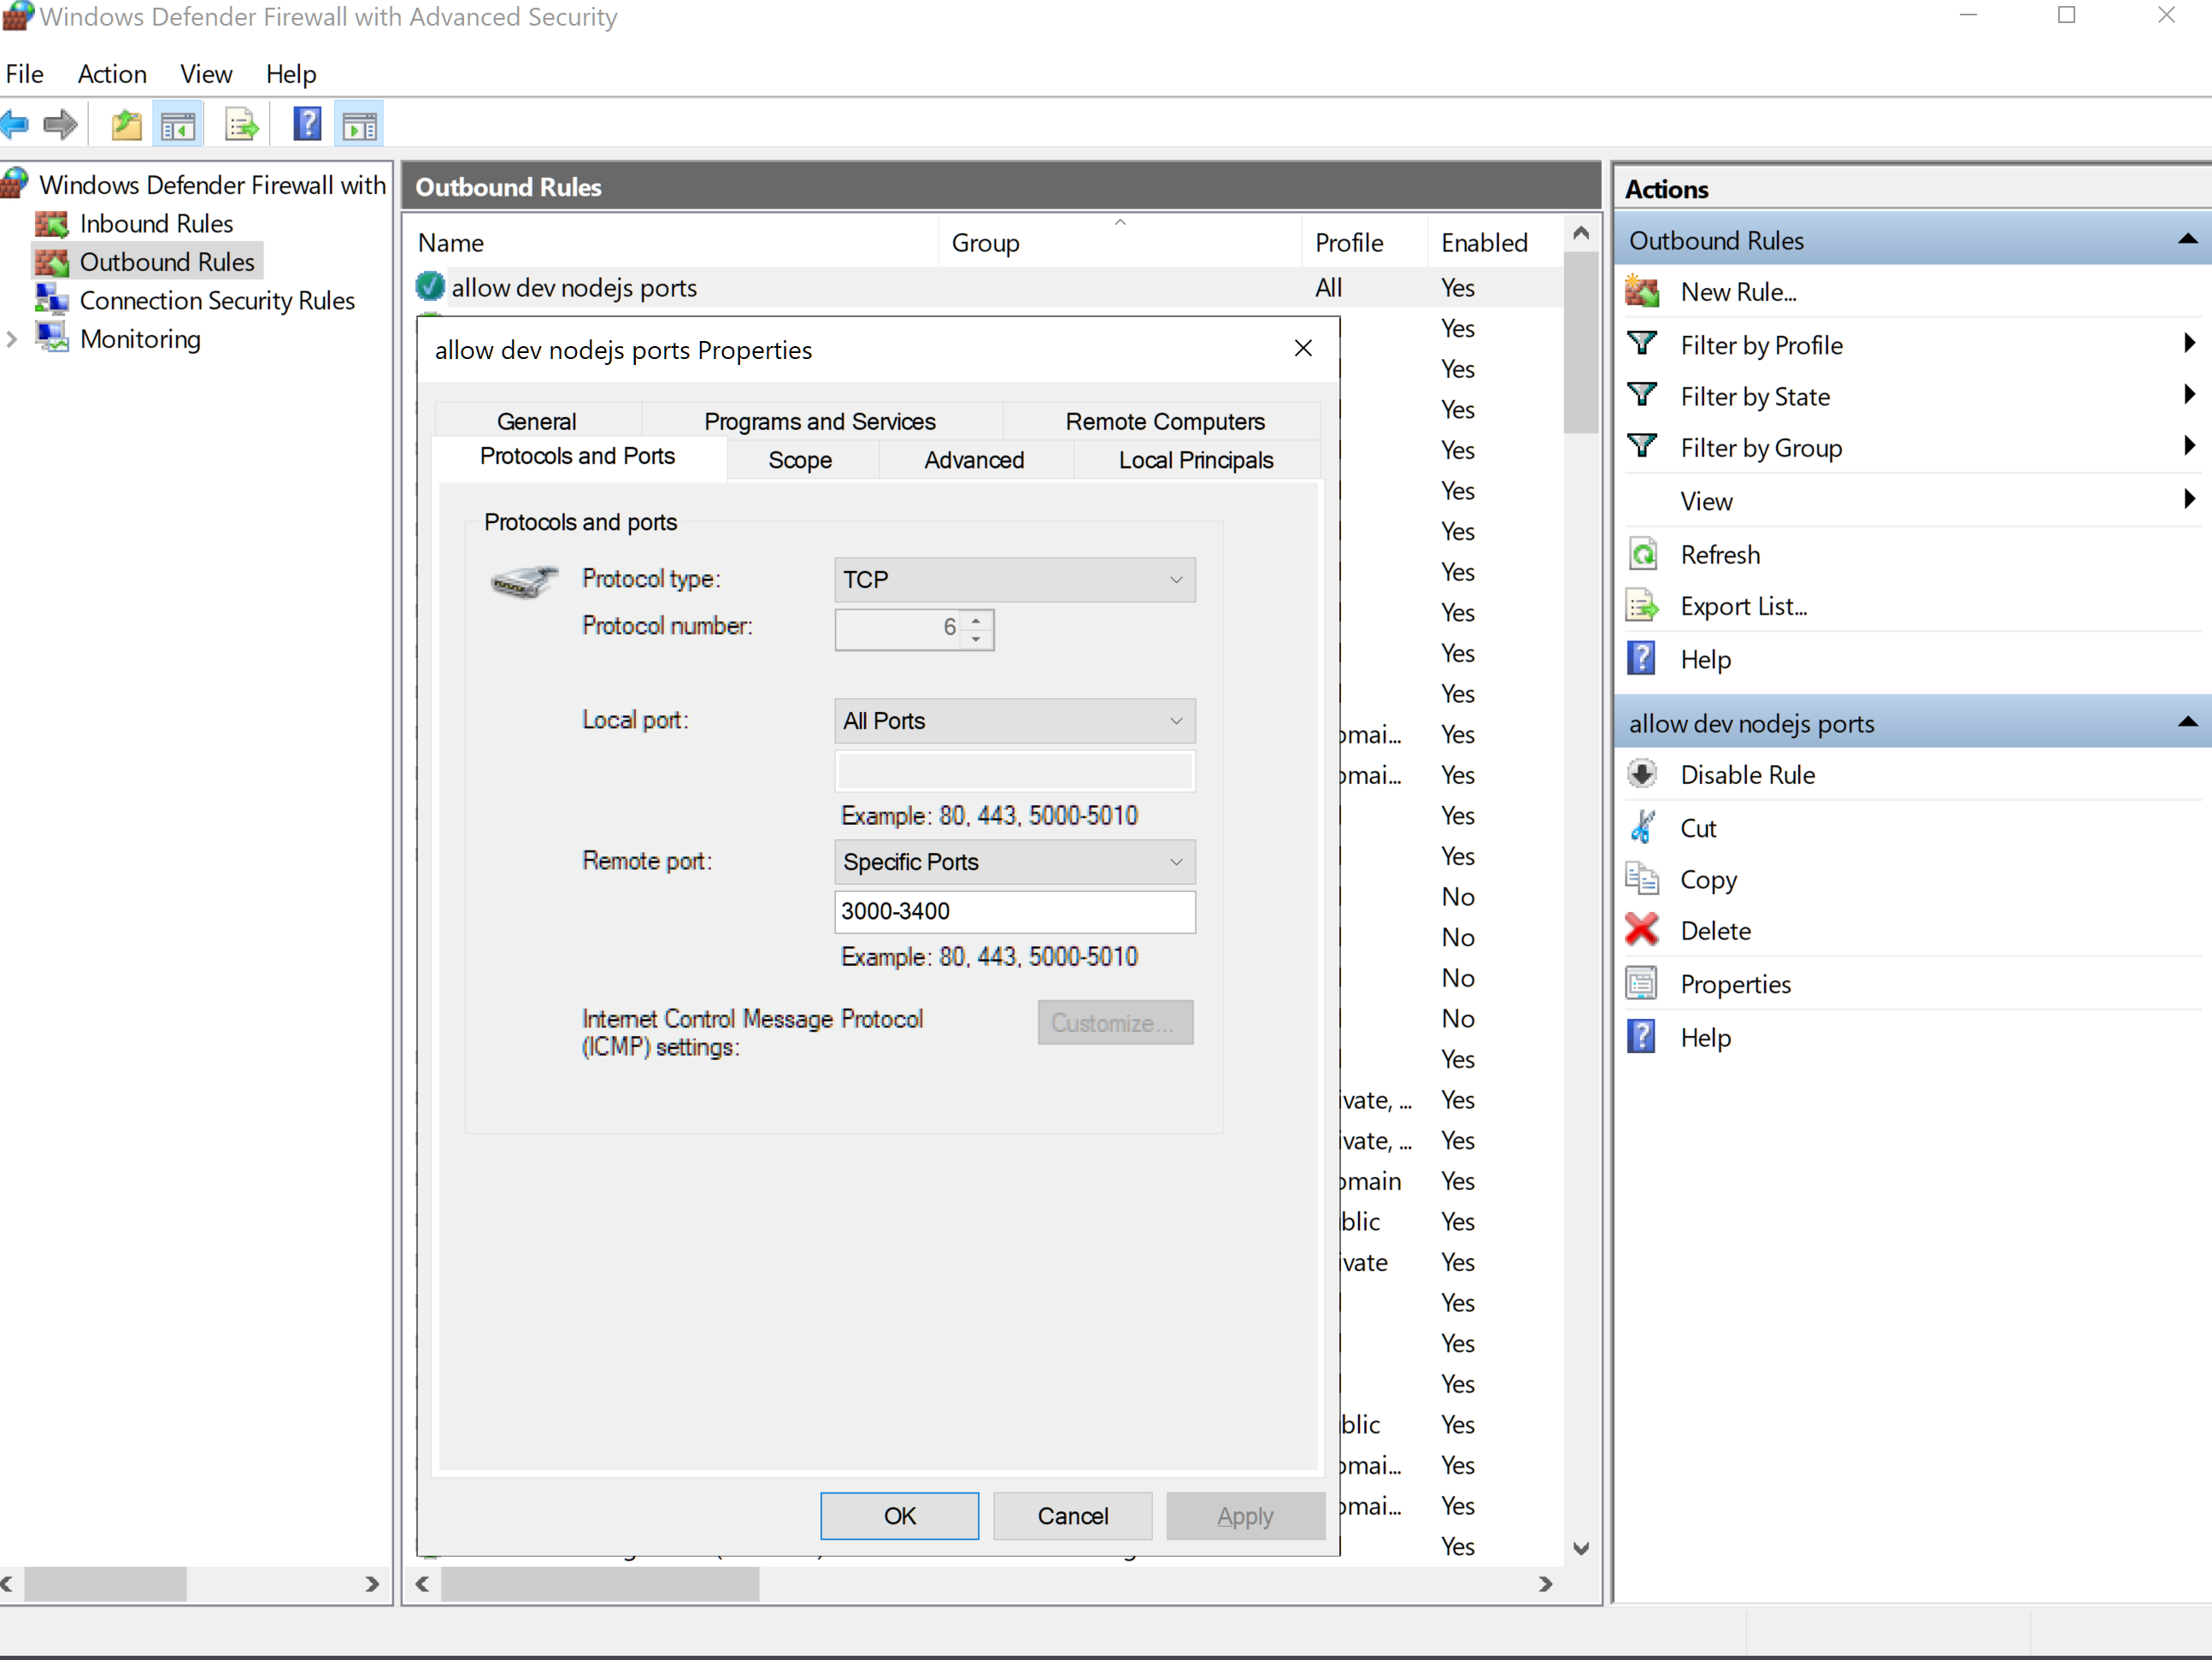
- Đối với port mình sẽ vào windows defender firewall with Advanced Security, Mình tạo rules cho cả inbound rules và outbound rules cho port đó ( mục đích là mình muốn các máy khác cùng network sẽ truy cập vào được )
Cho phép các chương trình vượt rào firewall
Cho phép port pass tường firewall
INBOUND: Khi bạn cho phép thì máy bên ngoài mới vào được

OUTBOUND: Khi bạn cho phép thì bên trong upload / traffic ra ngoài được
Malwarebytes
tương tự như trên, cho phép folder không cần phải check và vượt firewall, cho phép website, cho phép application nào.
Phần này mình không cần phải nói nhiều nữa nhé.
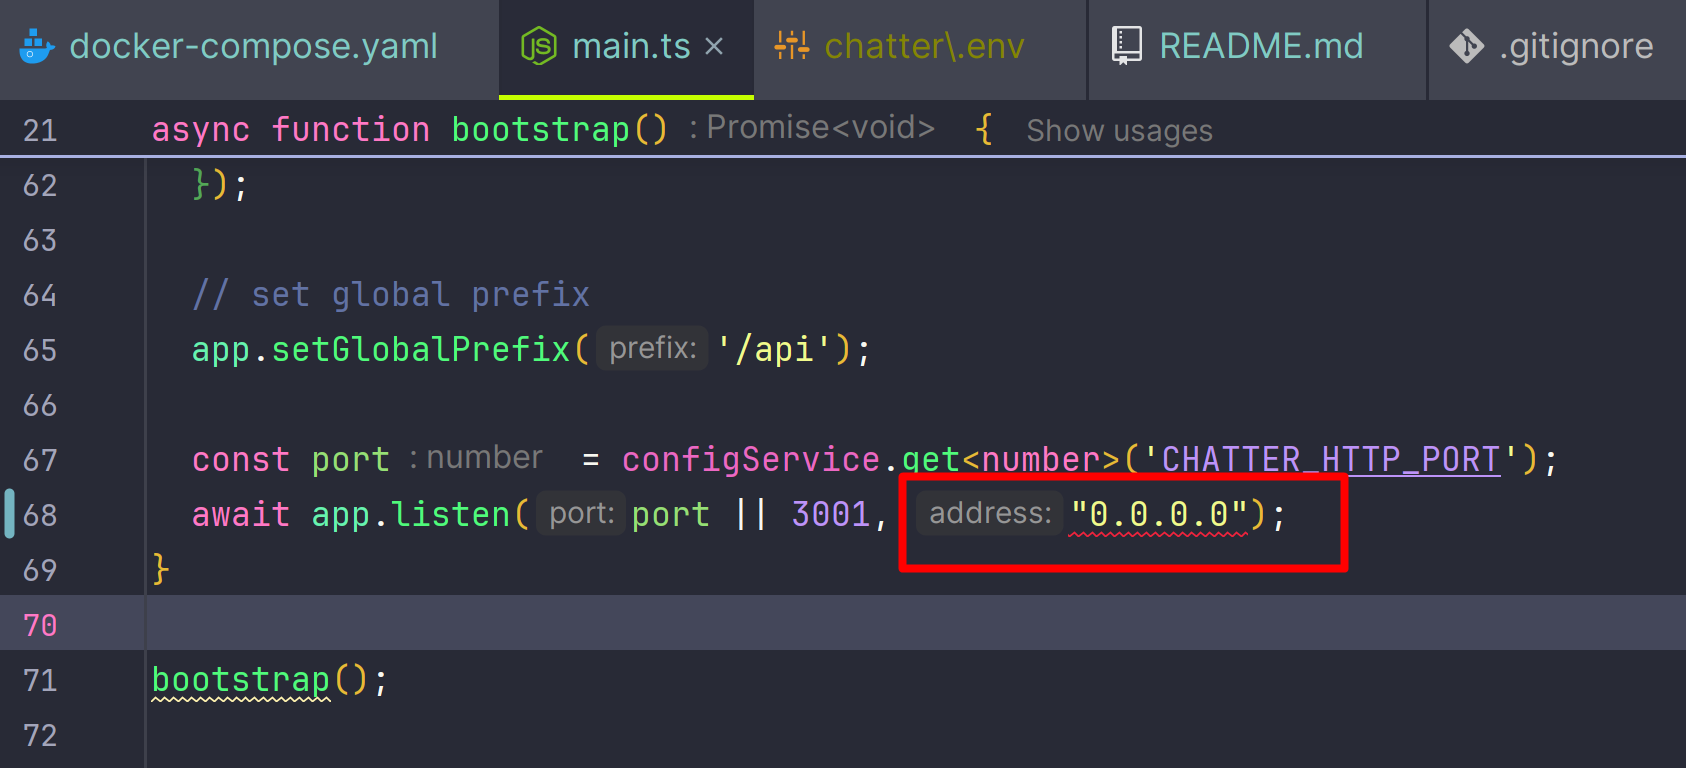
App không trỏ vào đúng ip address
Đầu tiên cần fix lỗi trên code của app main.ts cần listen vào host nào, ở đây mình để any host tức là 0.0.0.0
DNS Ubuntu server mặc định không đúng
Thứ hai, cần phải setup lại resolve.conf trong folder /etc của wsl ubuntu của bạn:
sudo rm /etc/resolv.conf
sudo vi /etc/resolv.confđánh pass vào rồi sửa file
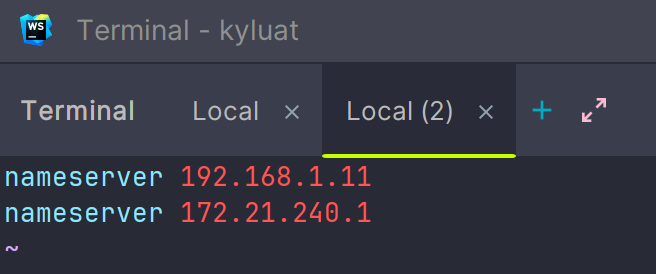
Ở đây mình chèn thêm dns local server của nhà mình vào: 192.168.1.11 để nó resolve các name trong network cho đúng ví dụ: postgres.kyluat.lan, nginx.kyluat.lan, ... Save file này lại
Trường hợp không save được vì permission thì xài lệnh sau để unlock lệnh chattr ( change attribute , cho hay không cho thay đổi thuộc tính của một file ),
sudo chattr -i /etc/resolv.conflệnh này thường dùng không cho phép các chương trình được phép thay đổi giống chmod. để -i vào thì nó sẽ tắt chế độ đó. +i thì bật chế độ không cho thay đổi file.
Sau khi sửa xong thì nhớ bật chế độ không cho thay đổi thuộc tính lại:
sudo chattr +i /etc/resolv.confWSL config không đúng
Kế tiếp, bạn vào /etc/wsl.conf để khai báo cho wsl không được tạo thêm Resolv Conf
Thêm vào dòng này nếu chưa có:
[network]
generateResolvConf = false
generateHosts = true
networkingMode=NAT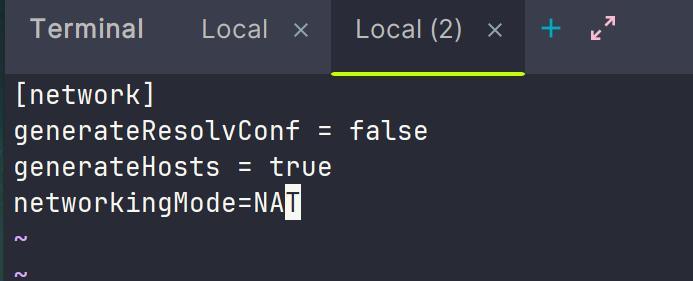
Save lại và khởi động lại hoặc vào command windows
wsl --shutdown
wslDNS của docker daemon không đúng
Chỉnh sửa DNS cho Docker trên ubuntu
sudo vi /etc/docker/daemon.jsonỞ nội dung file sau mình đã thêm "dns": ["192.168.1.11", "1.1.1.1"]
{
"exec-opts": ["native.cgroupdriver=cgroupfs"],
"log-driver": "json-file",
"log-opts": {
"max-size": "100m"
},
"storage-driver": "overlay2",
"dns": ["192.168.1.11","1.1.1.1"]
}192.168.1.11 là dns server mình đã setup
1.1.1.1 là dns server của cloudflare trường hợp dns server mình bị lỗi thì nó xài thẳng internet dns name server của cloudflare luôn
Các commands hửu ích trong ubuntu
Lỗi permission khi read/ write / không có permissions cho user hiện tại:
sudo chown -R $USER:$USER /home/Bạn muốn biết app đang chạy có đang listening không:
netstat -tulpn | grep LISTENtrên windows máy bạn có thể ping port tcp qua máy ubuntu không:
telnet 172.21.249.177 3000Kết quả trắng tinh / đen thui / không ra kết quả gì hết là connect được port tcp đó.
Còn không được thì nó sẽ báo Connecting To 172.21.249.177...Could not open connection to the host, on port 3000: Connect failed
ủa mà ip public của máy ubuntu là gì?
ifconfig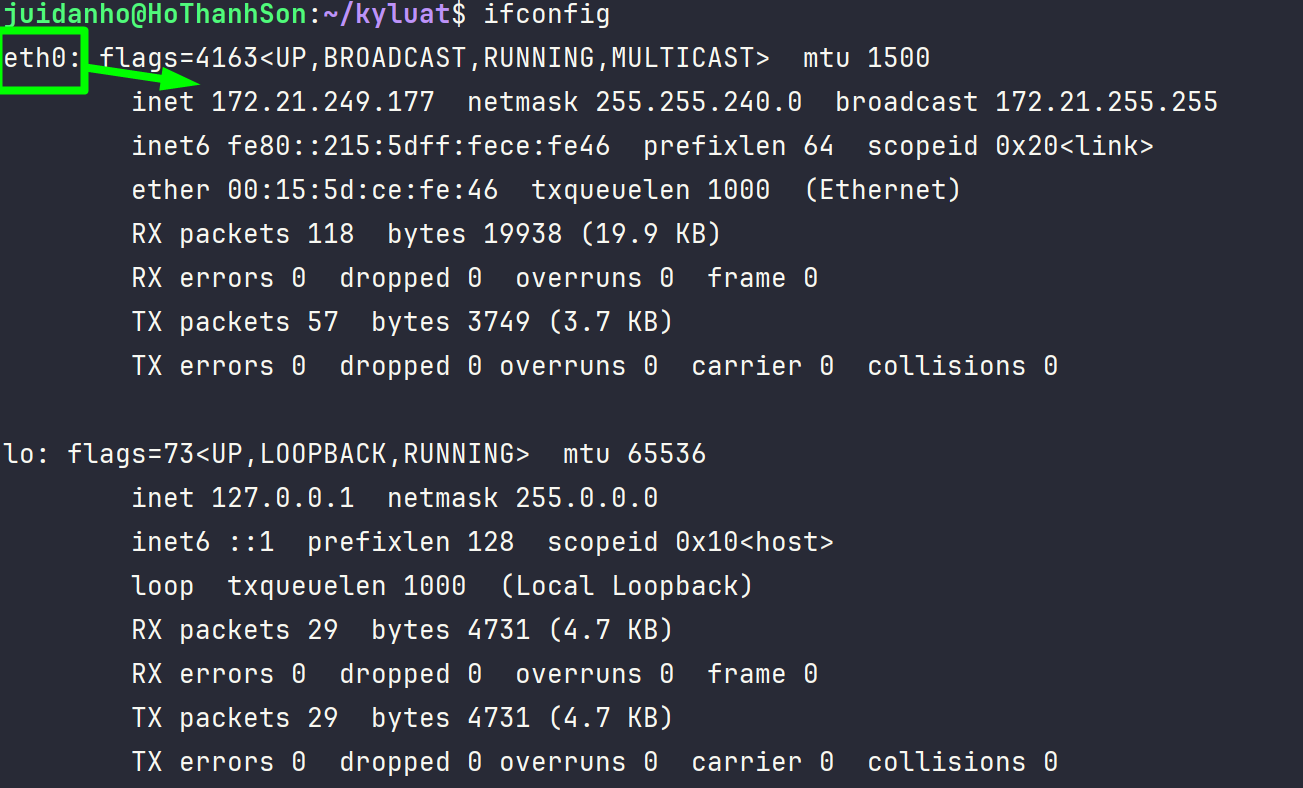
Hoặc trên command prompt của windows thì :
wsl hostname -I
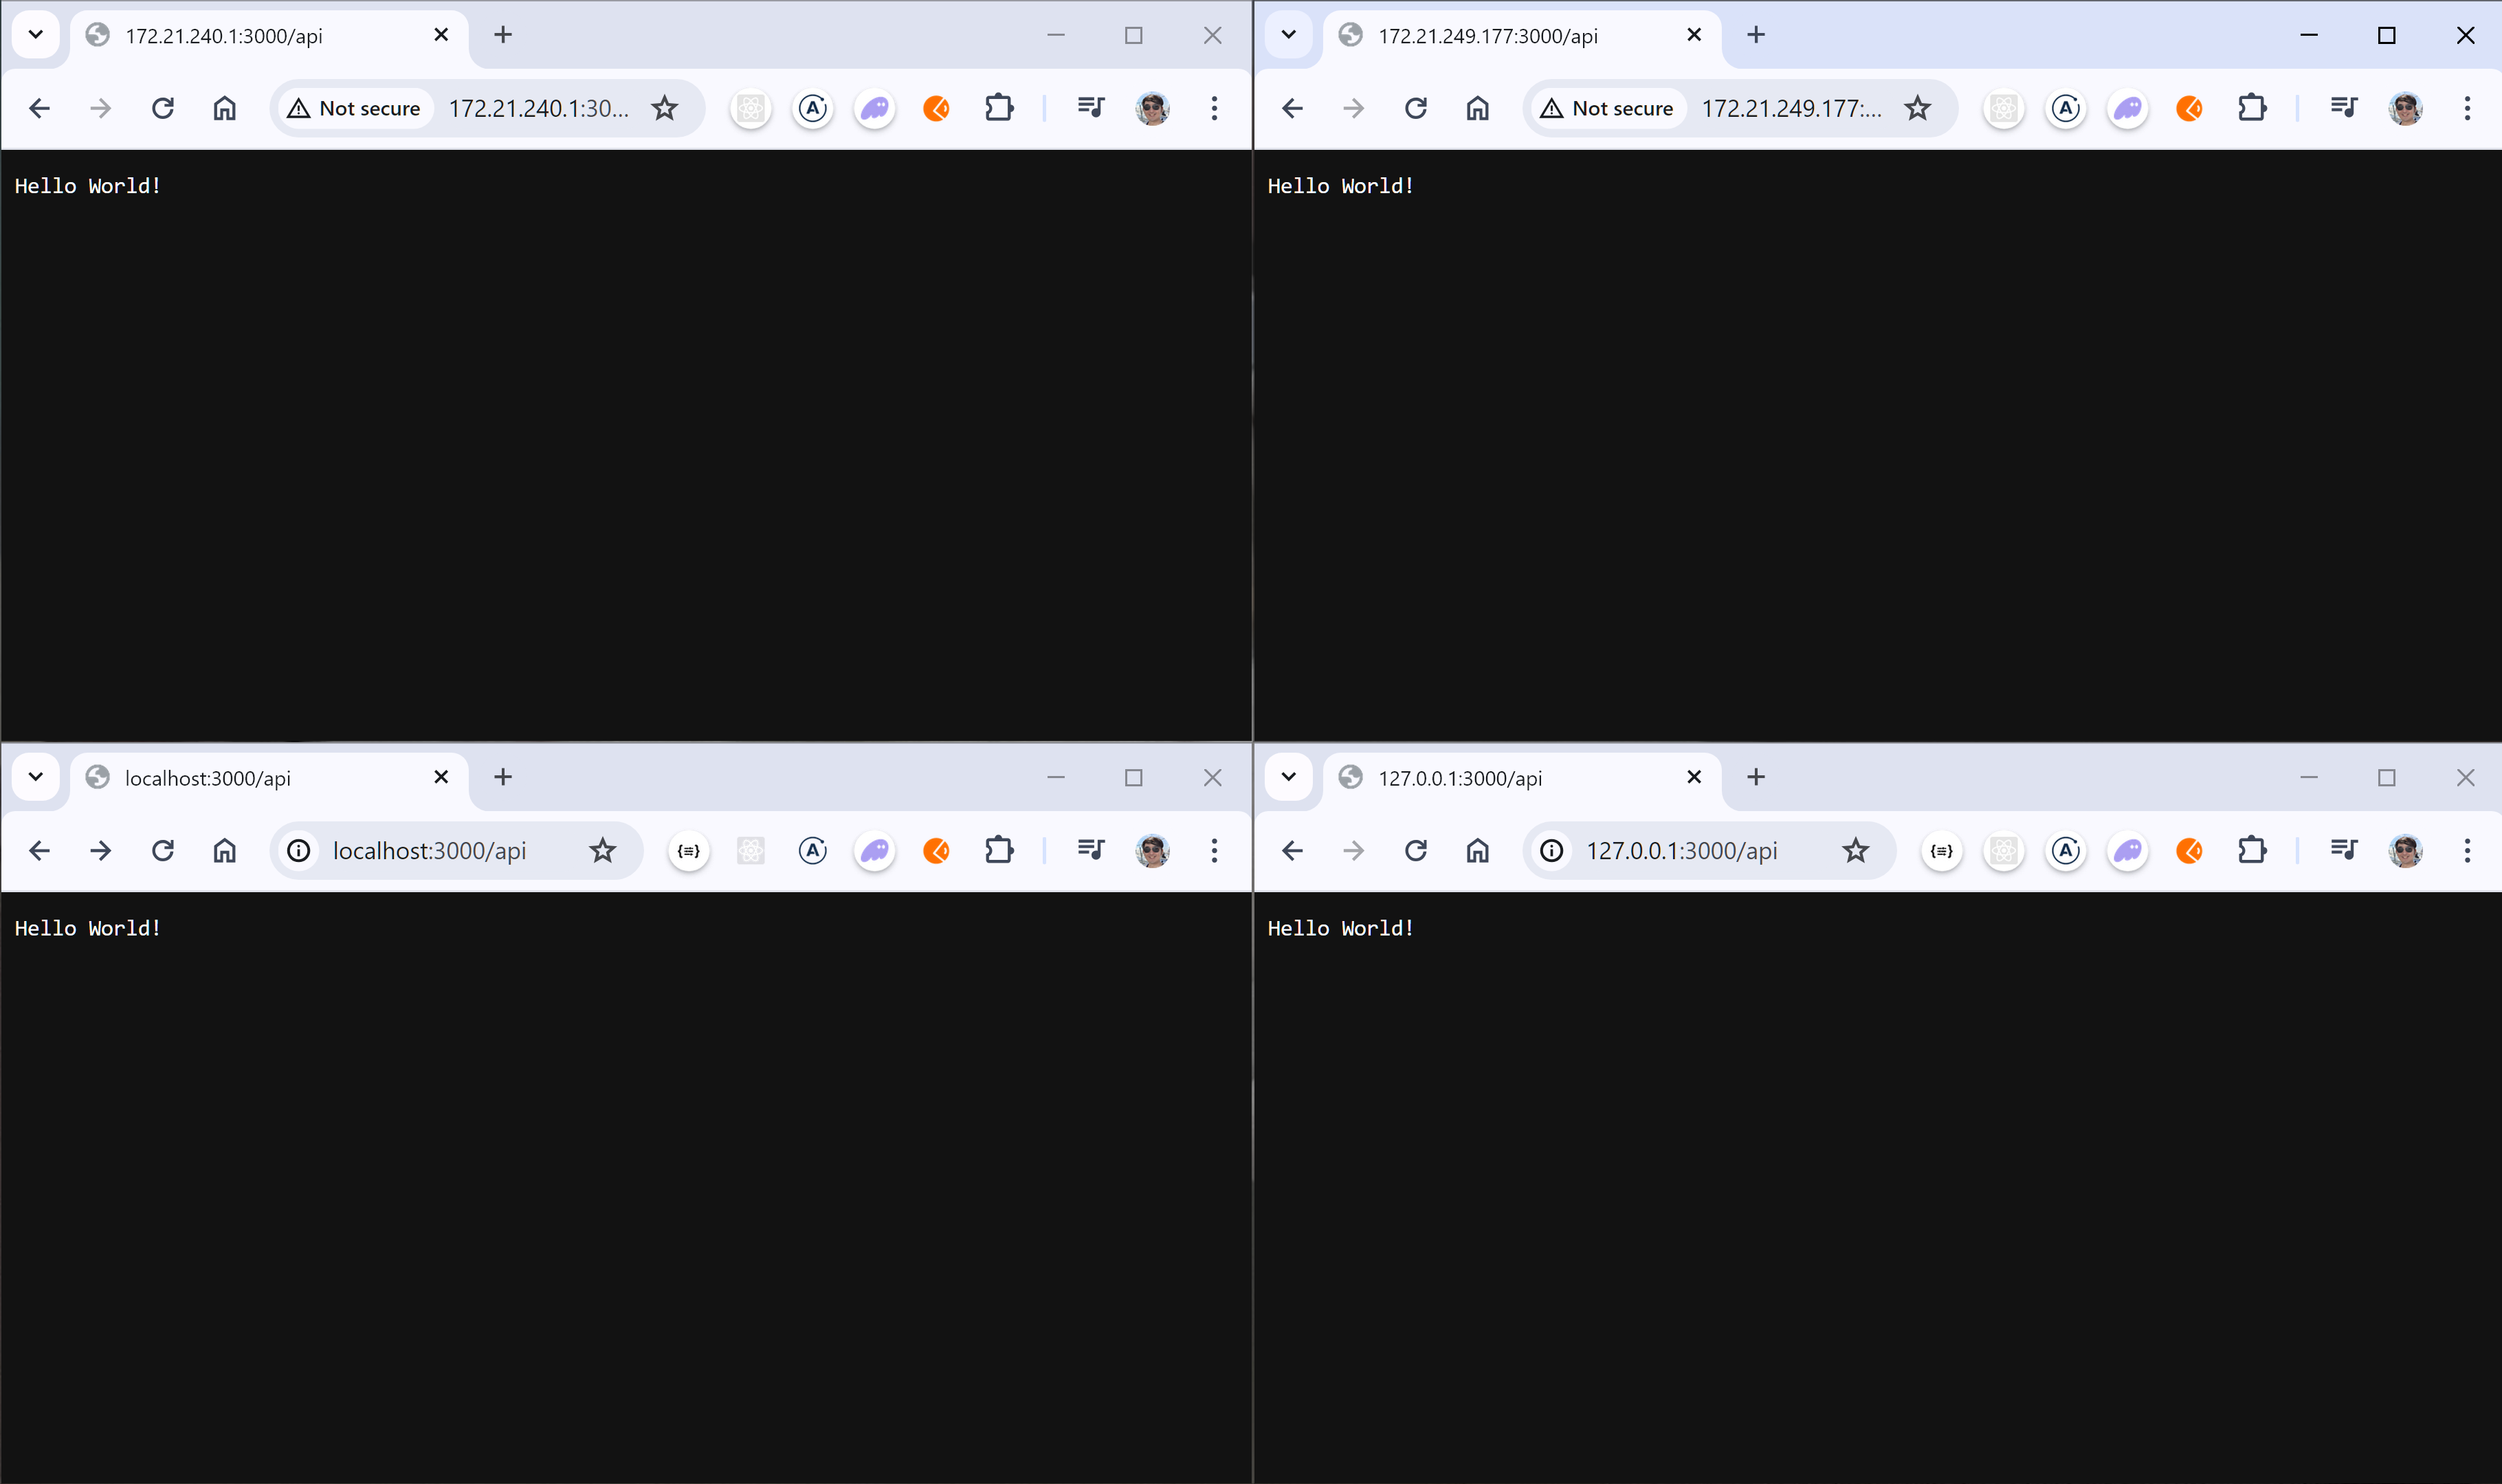
Sau khi chật vật hàng giờ thì cuối cùng thì mình đã hoàn thành với tất cả phương pháp trên.
Hy vọng bạn chiến đấu tiếp tục được với windows wsl2 ubuntu docker và nodejs app tốt hơn
Cấu hình cho WSL2 High Performance.
Ngoài ra, bạn có thể tăng tốc độ cho WSL2 bằng cách điều chỉnh cấu hình cho VM qua file .wslconfig trên windows 10 / 11 của bạn:
Bạn vào C:\Users\HoThanhSon rồi tạo file .wslconfig với nội dụng như sau
HoThanhSon là tên account máy của bạn

[wsl2]
# Limits VM memory to use no more than 4 GB, this can be set as whole numbers using GB or MB
memory=64GB
# Sets the VM to use two virtual processors
processors=16
Càng nhiều thì càng tốt nhưng cũng đừng để quá cao ngốn sạch hết ram và process của máy để không làm được nhiều việc khác. Và đương nhiên là nhớ reboot lại máy hoặc dùng command để thông số được áp dụng.

Kết quả là hiện tại khi sử dụng docker compose up trên wsl ubuntu thì webpack đã chạy mất 3s , trước đó là từ 11s->60s
Các tài liệu liên quan bạn có thể nghiệm thêm:
- Accessing network applications with WSL
- can't access 127.0.0.1:80 outside of WSL2 / Ubuntu 20.04
- Ubuntu WSL with docker could not be found
Cài Đặt WSL2 trên windows 10, không nên xài docker desktop mà nên cài thẳng lên ubuntu
Không nên cài Docker Desktop vì:
- Không stable, lỗi quá nhiều với wsl2, crash tùm lum
- WSL tự thay đổi quá nhiều thứ behind the scence để thích ứng với docker desktop như networking, firewall, dns , ...
Hướng dẫn cài WSL trên windows 10
Đòi hỏi sẽ phải cần Mở Windows Features on:
- Hyper-V
- .NET 4.8
- Virtual Machine Platform
- Windows Subsystem for Linux
- Cài WSL2 bình thường với ubuntu latest
List Linux Distro Available:
wsl.exe -l -oInstall Version
wsl.exe --install -d Ubuntu-24.04
wsl --set-version Ubuntu-22.04 2
wsl --updateConfig WSL sửa lỗi WSL2 theo bài cũ: https://wiki.kyluat.com/books/programming/page/windows-wsl-ubuntu-docker-node-nestjs-app-khong-vao-duoc
Cấu hình wsl nâng ram và cpus trên windows
tạo file .wslconfig theo path: c:/users/hothanhson/.wslconfig
[wsl2]
# Limits VM memory to use no more than 4 GB, this can be set as whole numbers using GB or MB
memory=32GB
# Sets the VM to use two virtual processors
processors=8
kernelCommandLine = cgroup_no_v1=all
[experimental]
autoMemoryReclaim=trueauto memory reclaim để wsl nó reset lại memory khi bị leak
/etc/resolv.conf
sudo chattr -f -i /etc/resolv.conf
sudo vi /etc/resolv.confnameserver 192.168.1.11
nameserver 172.21.240.1
sudo chattr -f +i /etc/resolv.conf/etc/wsl.conf
[boot]
systemd=true
[network]
generateResolvConf = false
generateHosts = true
networkingMode=NAT
Mặc định command sudo
Config user sao cho không có cần đánh sudo và password nhiều
sudo su -
sudo visudo
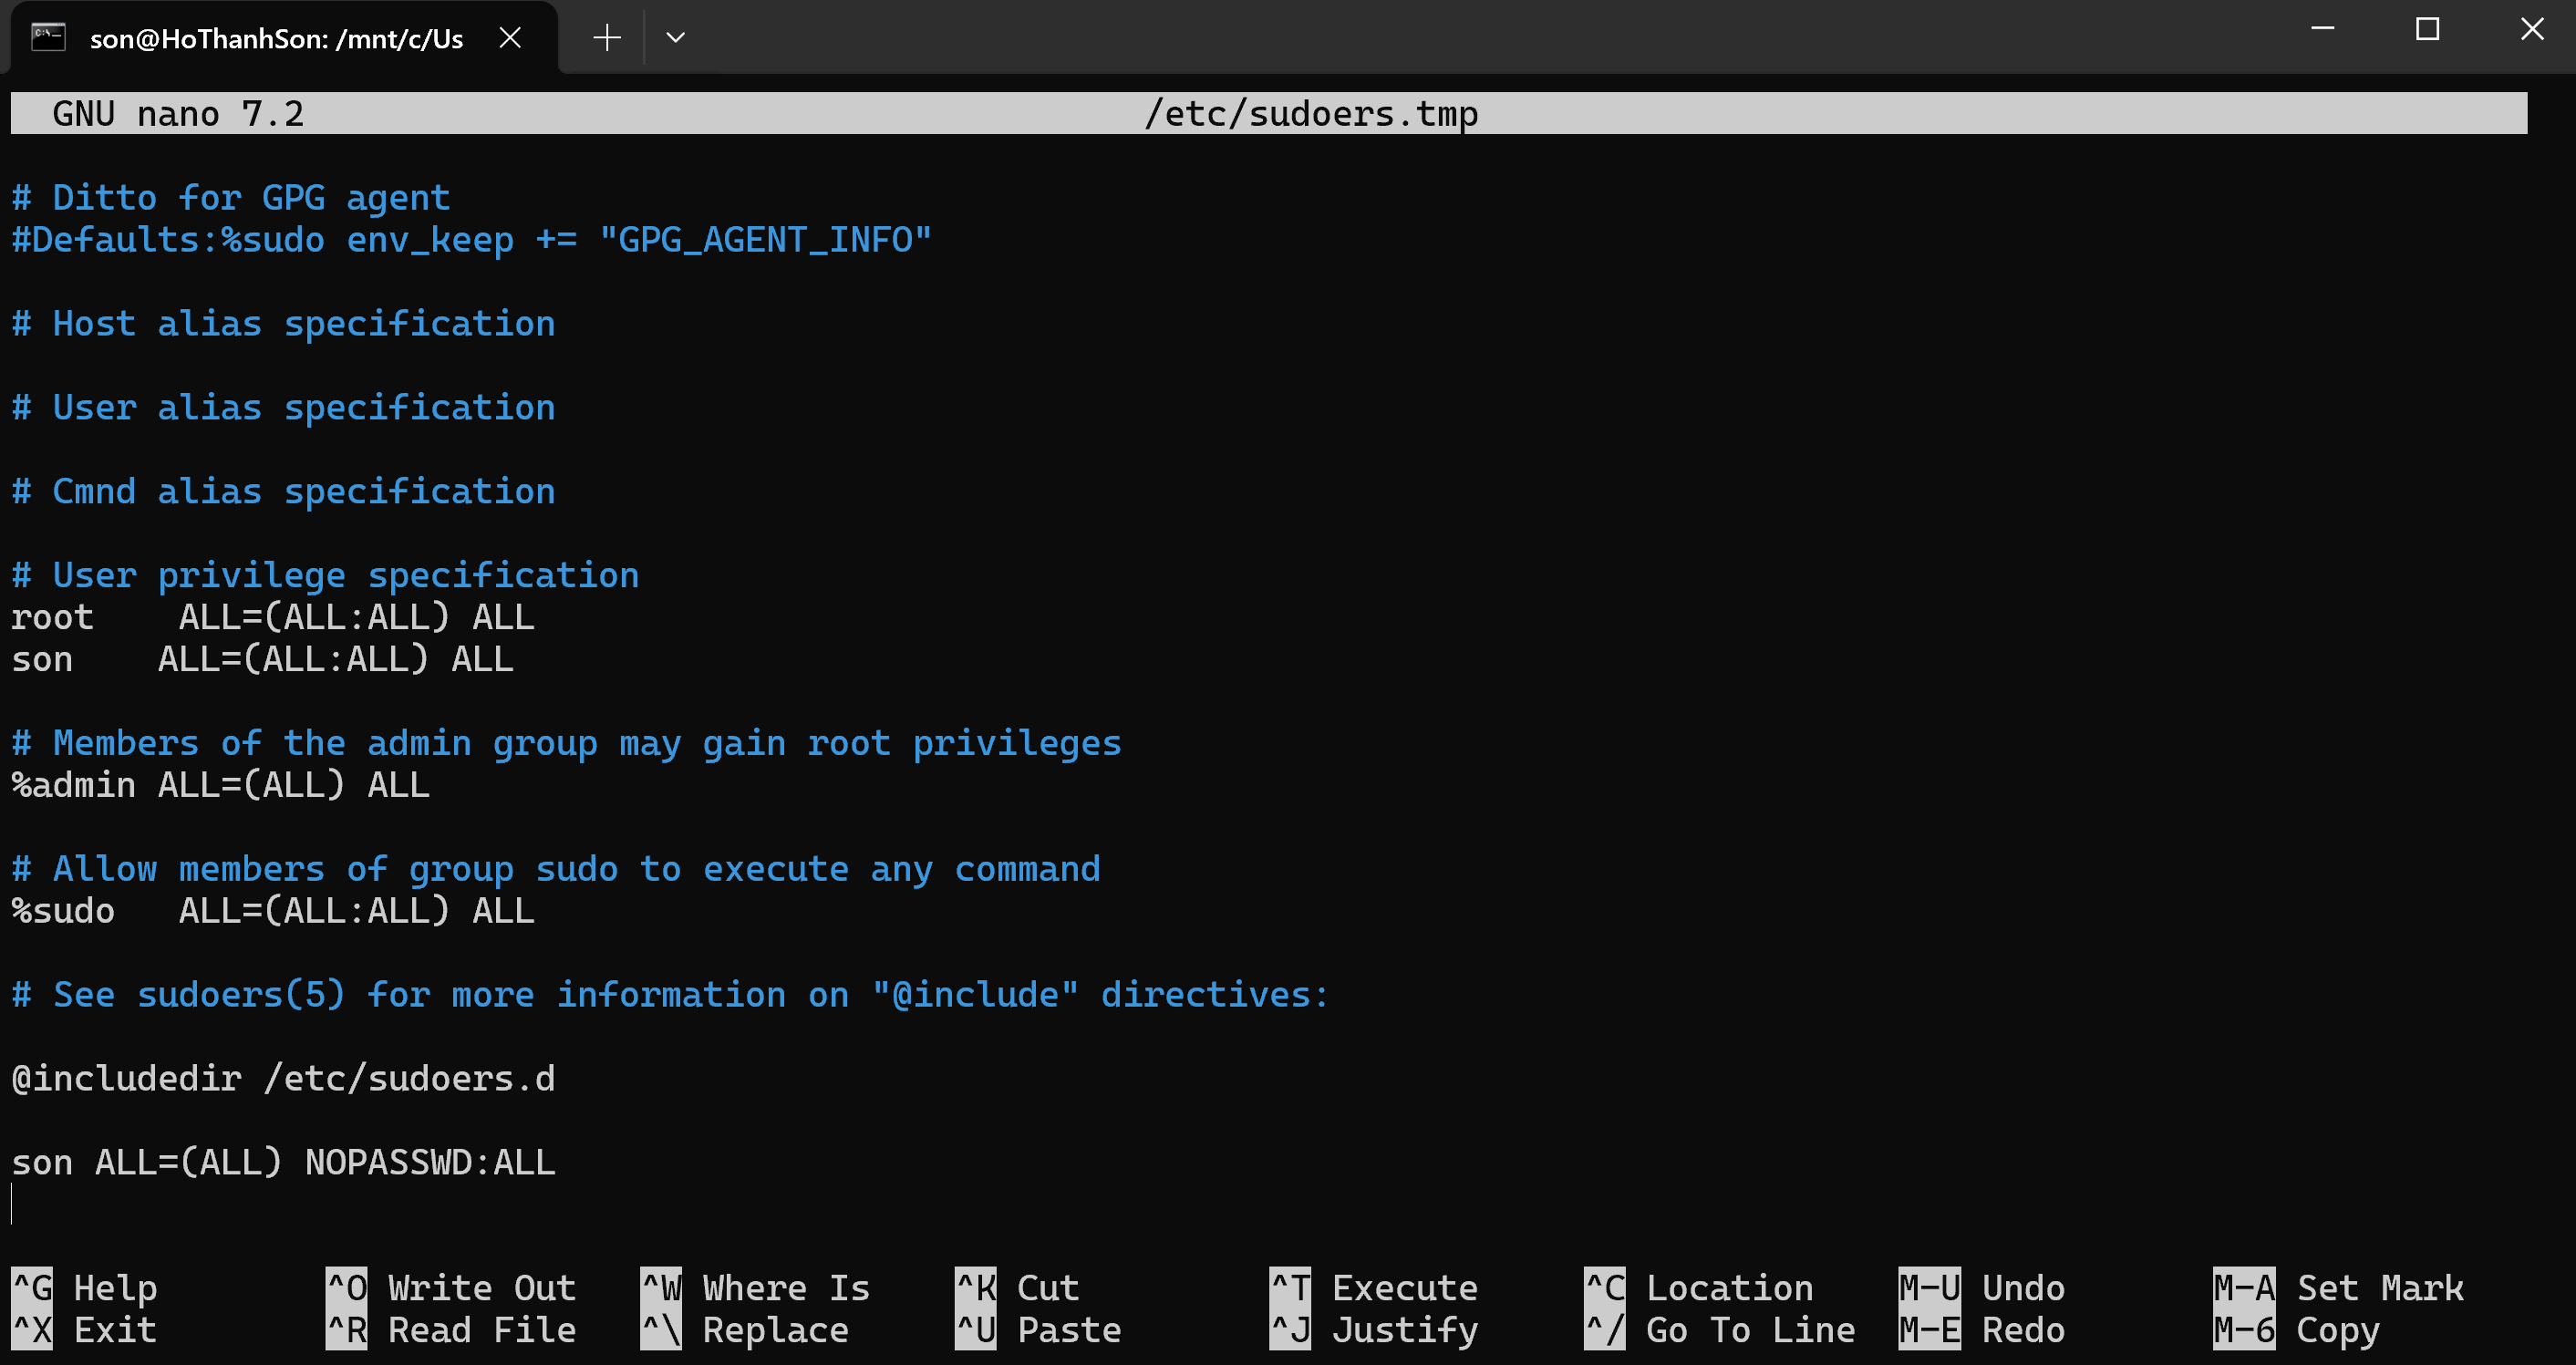
Thêm
- son ALL=(ALL:ALL) ALL
- son ALL=(ALL) NOPASSWD:ALL
- son là username của ubuntu
Cài đặt docker trên ubuntu
https://docs.docker.com/engine/install/ubuntu/
Cài đặt docker dns ở /etc/docker/daemon.json
{
"exec-opts": ["native.cgroupdriver=cgroupfs"],
"log-driver": "json-file",
"log-opts": {
"max-size": "100m"
},
"storage-driver": "overlay2",
"dns": ["192.168.1.11", "8.8.8.8"],
"iptables": false
}
Cài đặt GPU lên ubuntu
https://github.com/ashishpatel26/Cuda-installation-on-WSL2-Ubuntu-20.04-and-Windows11?tab=readme-ov-file
Xem coi mình đang xài GPU gì:
nhấn WIN+R đánh dxdiag để check mình đang xài graphic card gì
WIN+Rdxdiag
Command sau đây sẽ install online ( mất tầm 15p )
wget https://developer.download.nvidia.com/compute/cuda/repos/wsl-ubuntu/x86_64/cuda-keyring_1.1-1_all.deb
sudo dpkg -i cuda-keyring_1.1-1_all.deb
sudo apt-get update
sudo apt-get -y install cuda-toolkit-12-4cài đặt nvdia container toolkit cho docker:
sudo nano /etc/apt/sources.list
Thêm vào dòng này để có repo cài libt5info missing:
deb http://archive.ubuntu.com/ubuntu/ lunar universecurl -fsSL https://nvidia.github.io/libnvidia-container/gpgkey | sudo gpg --dearmor -o /usr/share/keyrings/nvidia-container-toolkit-keyring.gpg \
&& curl -s -L https://nvidia.github.io/libnvidia-container/stable/deb/nvidia-container-toolkit.list | \
sed 's#deb https://#deb [signed-by=/usr/share/keyrings/nvidia-container-toolkit-keyring.gpg] https://#g' | \
sudo tee /etc/apt/sources.list.d/nvidia-container-toolkit.list
sed -i -e '/experimental/ s/^#//g' /etc/apt/sources.list.d/nvidia-container-toolkit.list
sudo apt-get update
sudo apt-get install -y nvidia-container-toolkit
sudo systemctl restart dockercài libsecret
sudo apt install libsecret-1-0
cài gnome keyring:
sudo apt install gnome-keyring
Add user vào docker group để khỏi hỏi Sudo hoài:
sudo usermod -aG docker $USER
Thêm quyền cho user son:
sudo usermod -aG sudo son
Kết quả:
Test Ubuntu với GPU:
nvidia-smi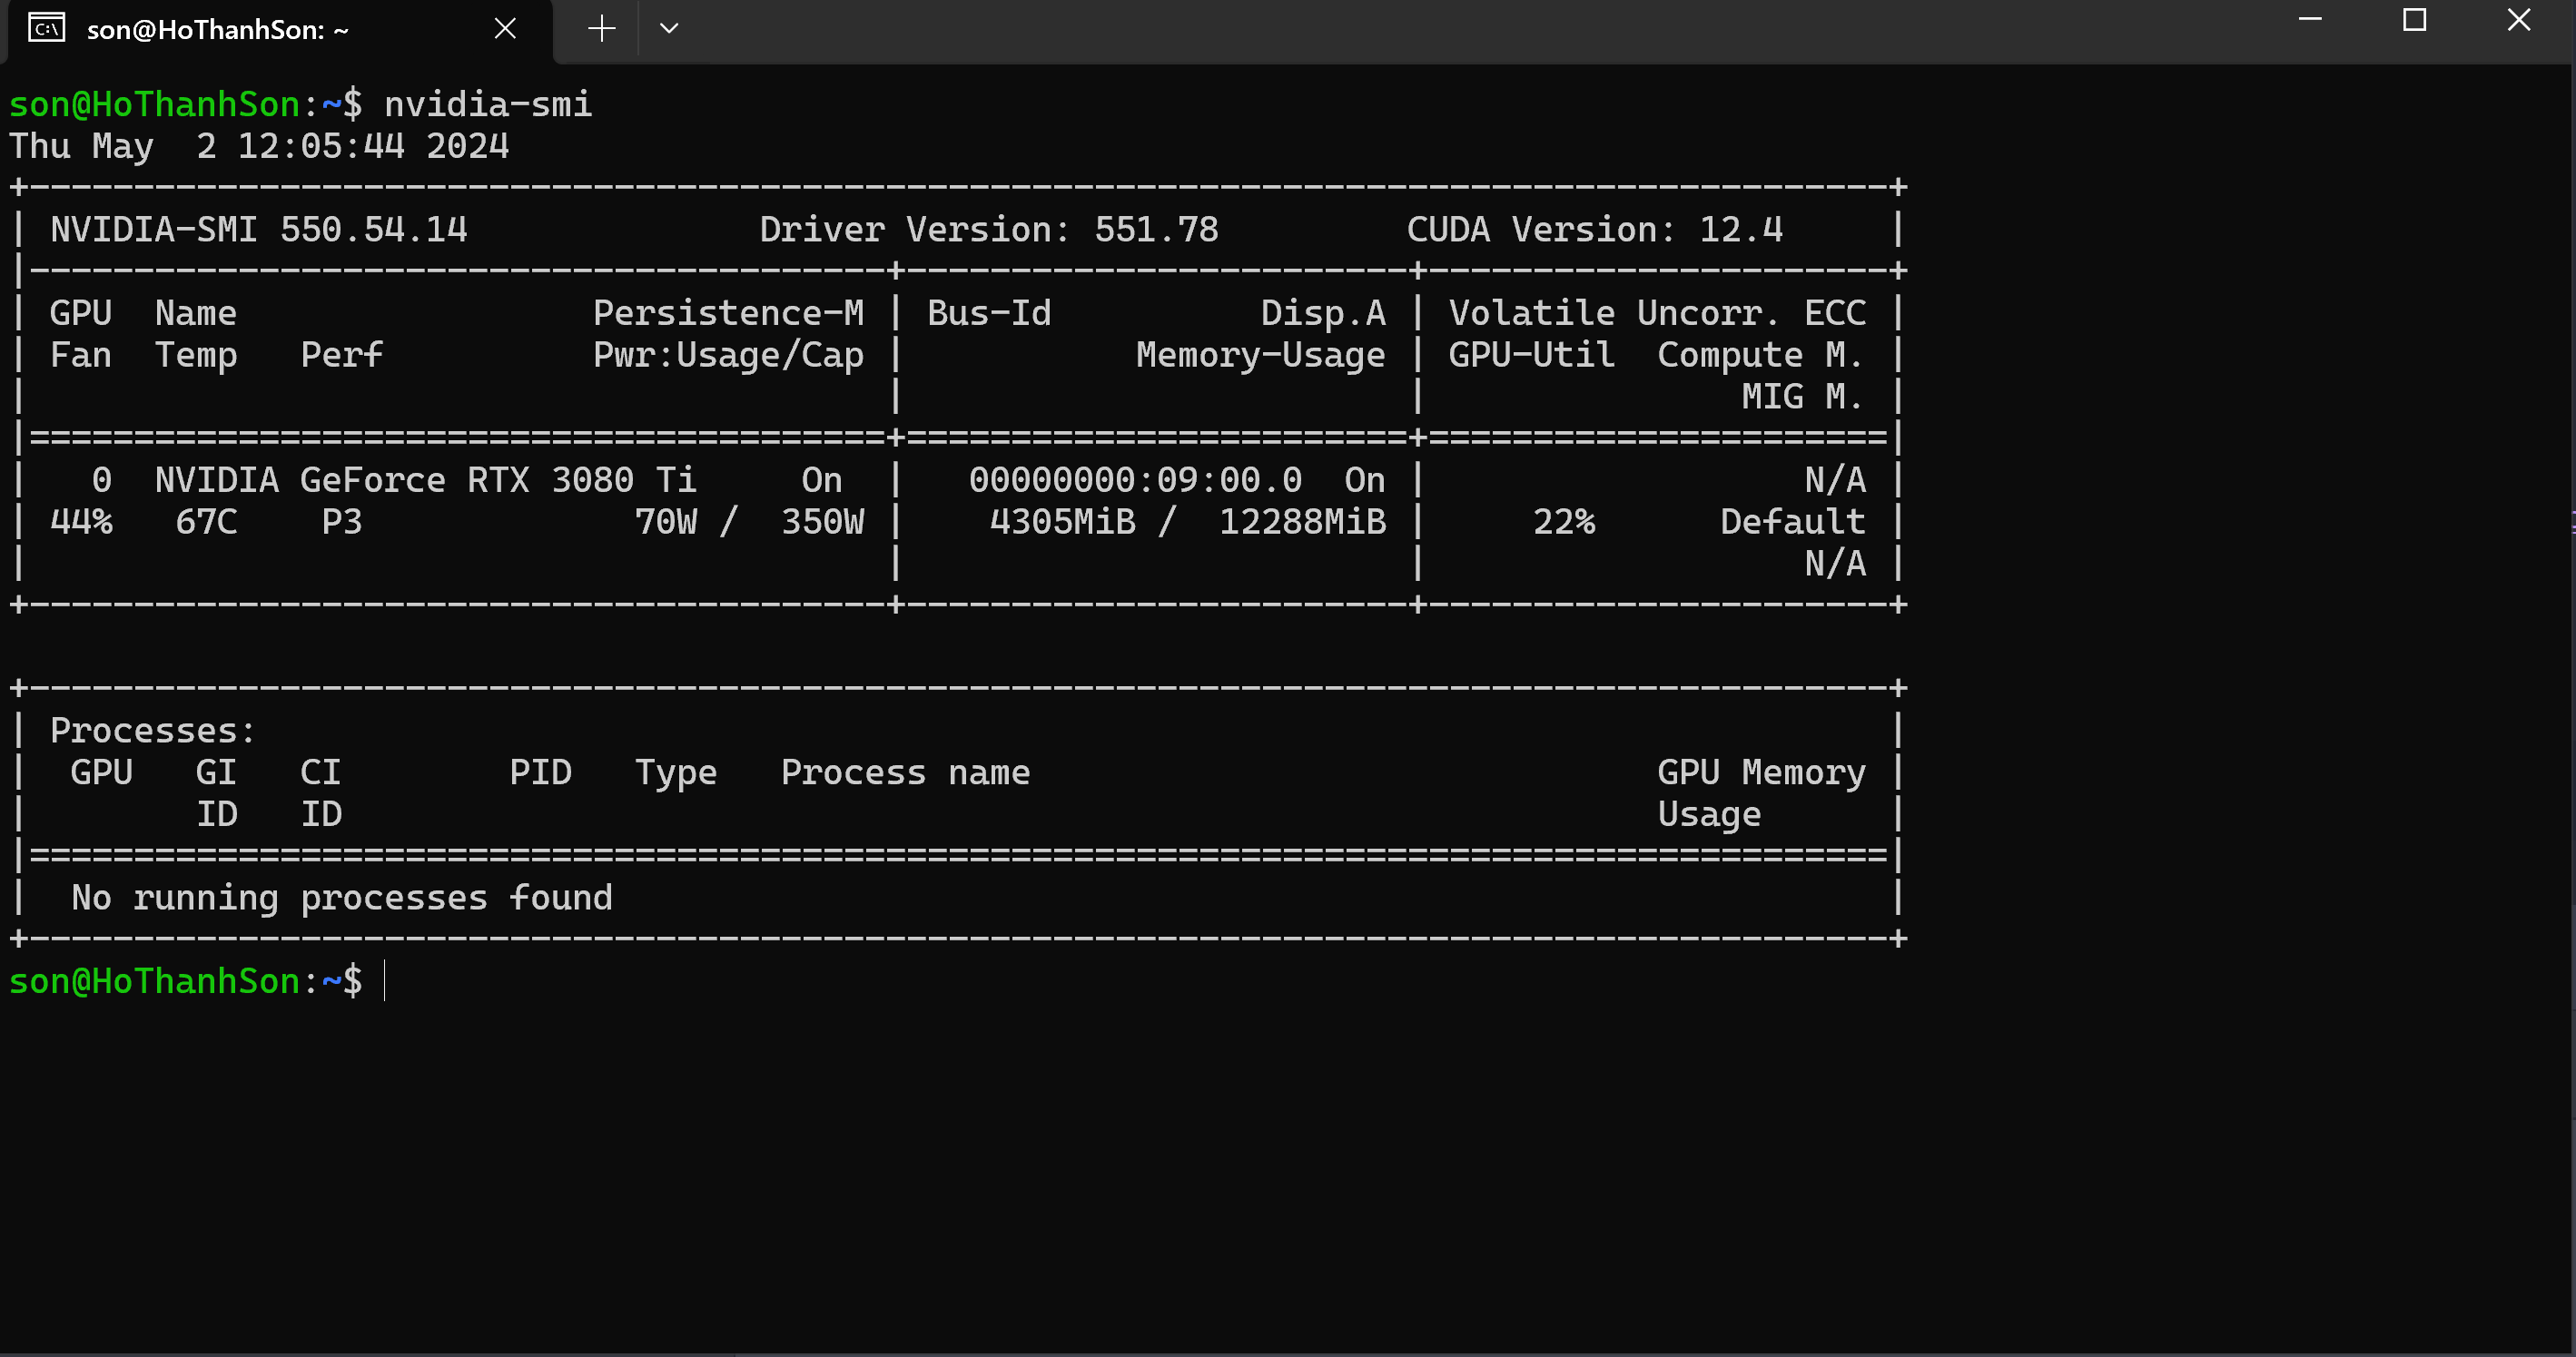
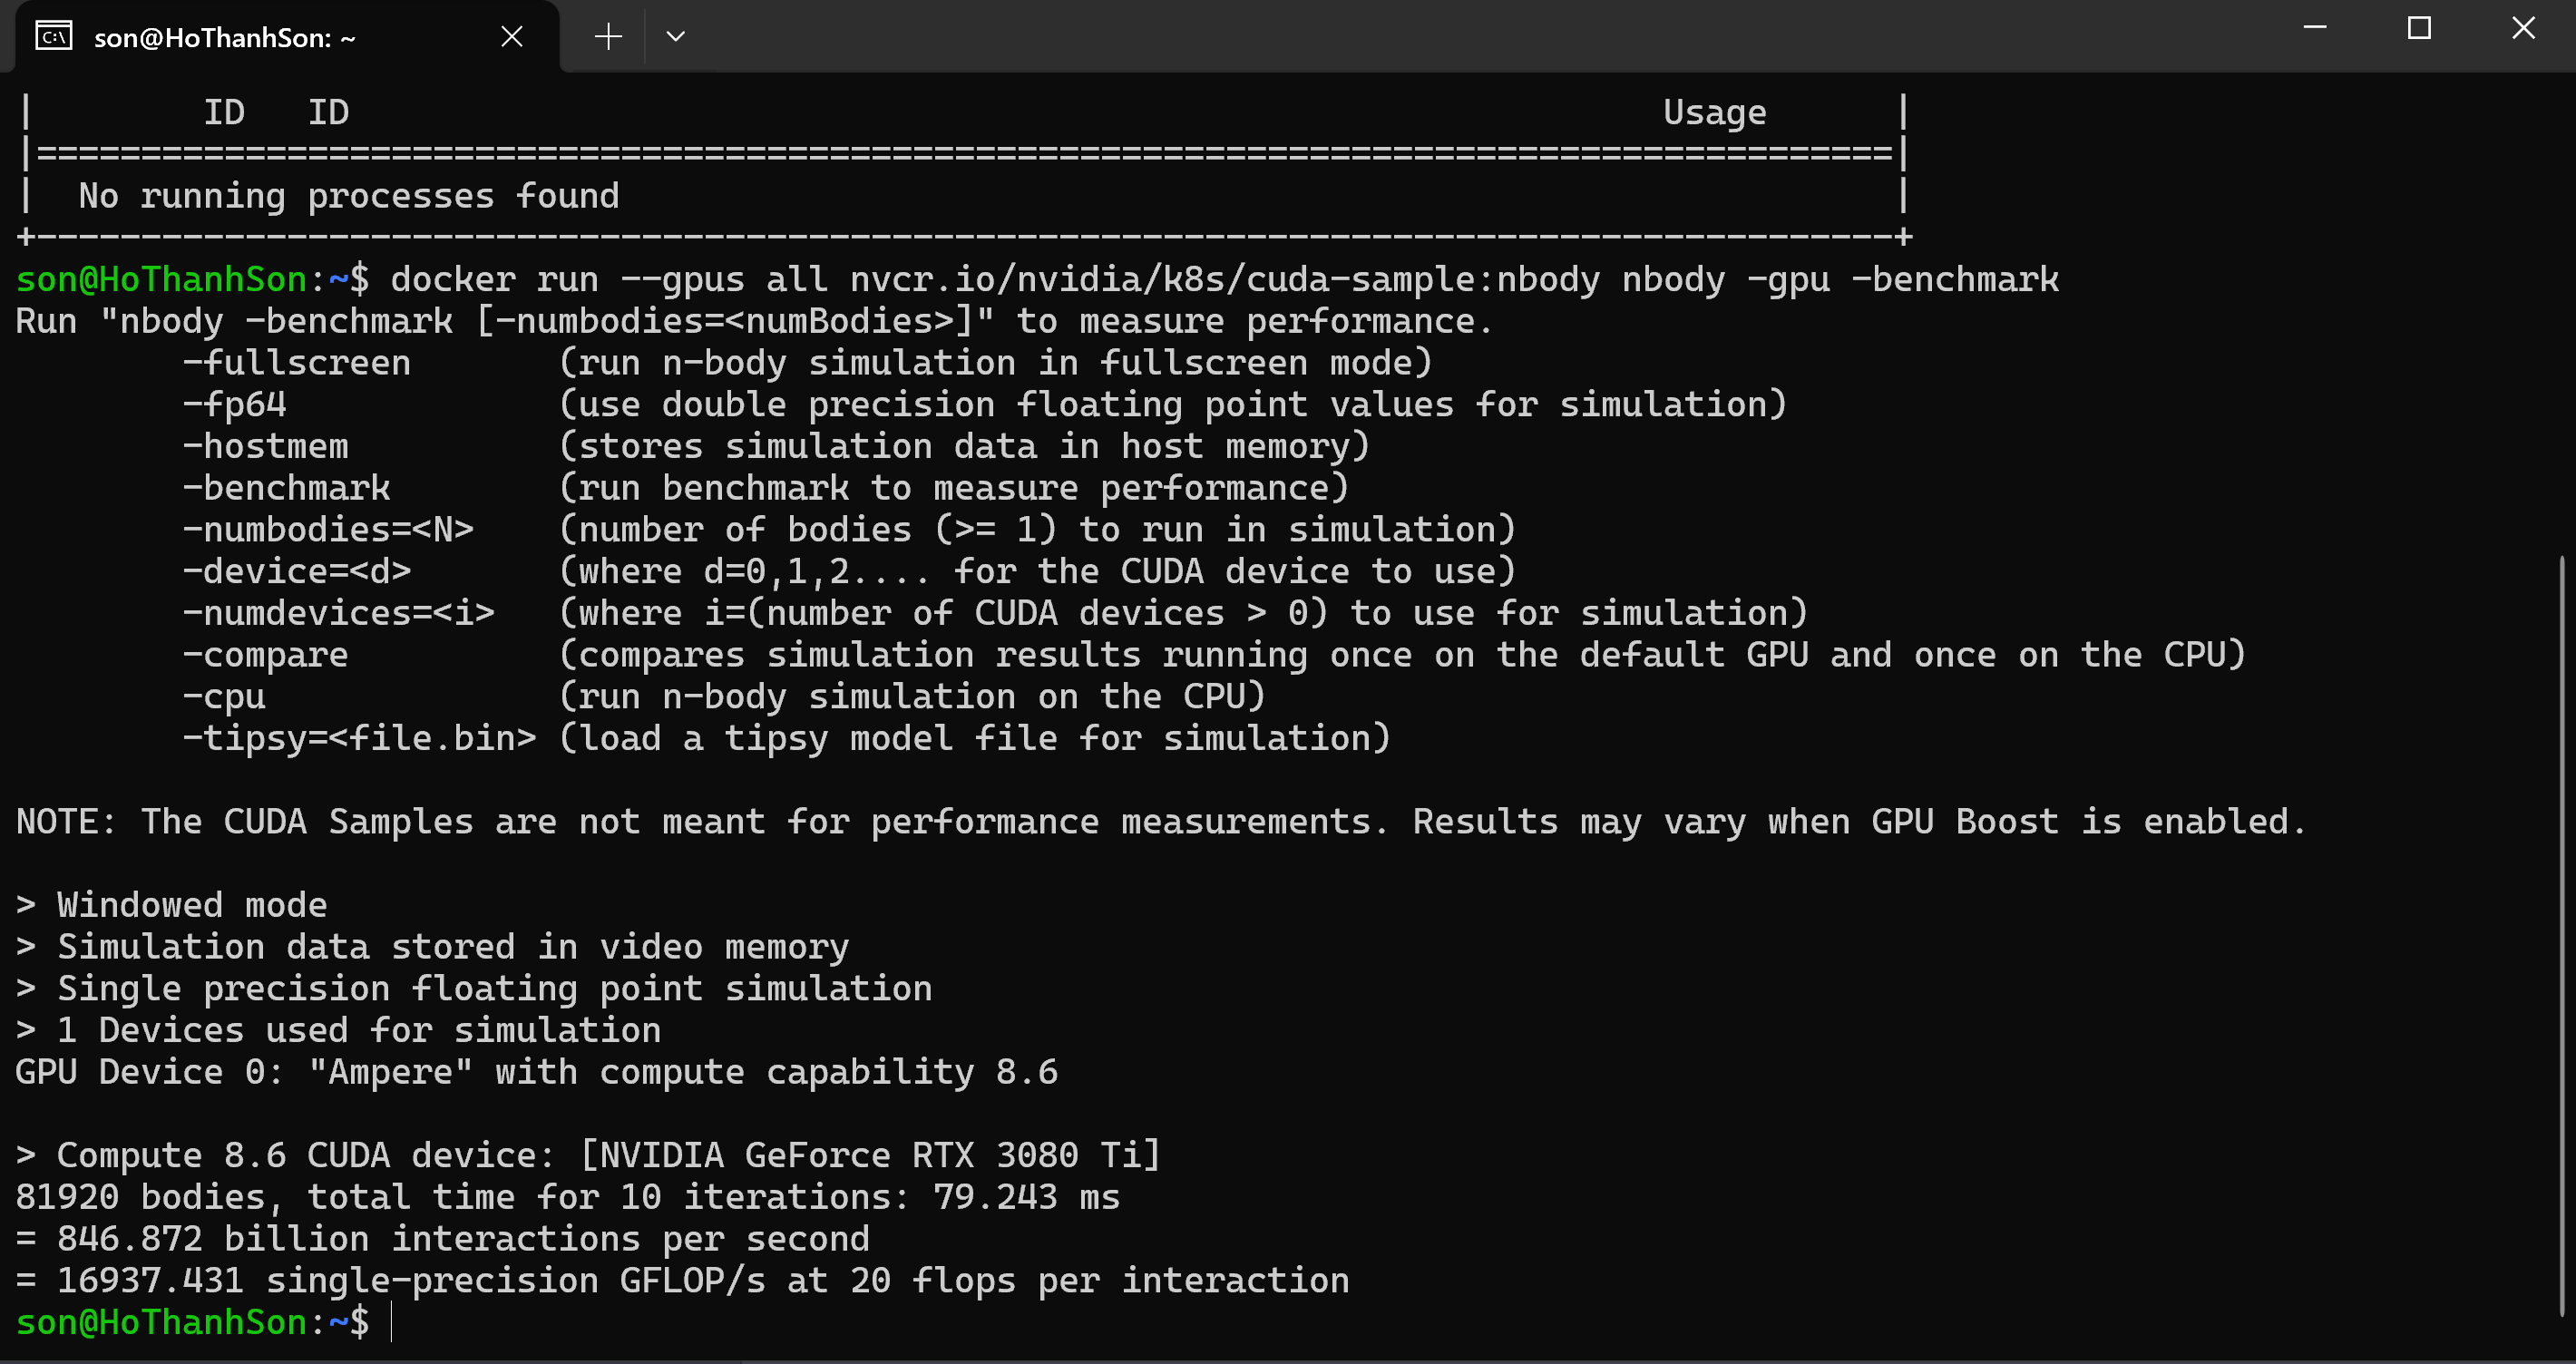
Test Docker với gpu:
docker run --gpus all nvcr.io/nvidia/k8s/cuda-sample:nbody nbody -gpu -benchmark
Docker Compose Template với GPU:
deploy:
resources:
reservations:
devices:
- driver: nvidia
count: 1
capabilities: [gpu]
The Crypto Wallet Tracker
Type of wallet:
- Pump & dump Wallet
- High Balance Wallet
- High Activity Wallet
- Wallet has CEX Inflow/Outflow
- Fresh Wallet on DEX
- KOL Wallets With X/Youtube
- Top Holders
Type of Transaction: Swap, Transfer, Mint, Add Liquidity Pool, Trading Enabled
ENOENT: PS, Spawn PS - Common Issues when Working with Nestjs, Nodejs and Docker
Working Environment:
- VsCode
- Debug Mode
- Nestjs
- Dockerfile
What did that happened?
After i ran docker compose up and then i change some file content in my local machine , it will trigger changed in the file system between local and remote host.
Error message:
auth-1 | Info Webpack is building your sources...
auth-1 |
auth-1 | webpack 5.97.1 compiled successfully in 30 ms
auth-1 | /bin/sh: 1: ps: not found
auth-1 | node:events:497
auth-1 | throw er; // Unhandled 'error' event
auth-1 | ^
auth-1 |
auth-1 | Error: spawn ps ENOENT
auth-1 | at ChildProcess._handle.onexit (node:internal/child_process:286:19)
auth-1 | at onErrorNT (node:internal/child_process:484:16)
auth-1 | at process.processTicksAndRejections (node:internal/process/task_queues:82:21)
auth-1 | Emitted 'error' event on ChildProcess instance at:
auth-1 | at ChildProcess._handle.onexit (node:internal/child_process:292:12)
auth-1 | at onErrorNT (node:internal/child_process:484:16)
auth-1 | at process.processTicksAndRejections (node:internal/process/task_queues:82:21) {
auth-1 | errno: -2,
auth-1 | code: 'ENOENT',
auth-1 | syscall: 'spawn ps',
auth-1 | path: 'ps',
auth-1 | spawnargs: [ '-o', 'pid', '--no-headers', '--ppid', 44 ]
auth-1 | }
auth-1 |
auth-1 | Node.js v21.7.3Problem: The problem is the docker container image you're using is missing procps
Solution:
RUN apt-get update && apt-get install -y procpsExample:
FROM node:21-bullseye-slim as development
RUN apt-get update && apt-get install -y procps
WORKDIR /usr/src/app
COPY package.json ./
COPY tsconfig.json tsconfig.json
COPY nest-cli.json nest-cli.json
COPY apps/auth/prisma ./prisma
VSCode Debug Nestjs and Docker Environment
in .vscode folder:
{
// Use IntelliSense to learn about possible attributes.
// Hover to view descriptions of existing attributes.
// For more information, visit: https://go.microsoft.com/fwlink/?linkid=830387
"version": "0.2.0",
"configurations": [
{
"type": "node",
"request": "attach",
"name": "Debug Nestjs Apps",
"address": "localhost",
"port": 9229,
"sourceMaps": true,
"restart": true,
"localRoot": "${workspaceFolder}",
"remoteRoot": "/usr/src/app"
}
]
}in docker-compose.yml
services:
auth:
build:
context: .
dockerfile: ./apps/auth/Dockerfile
target: development
command: npm run start:debug auth
env_file:
- ./apps/auth/.env
ports:
- '3000:3000'
- '9229:9229'
volumes:
- .:/usr/src/app
- /usr/src/app/node_modules
in package.json
edit the start:debug with ip address and port for remote debug:
"start:debug": "nest start --debug 0.0.0.0:9229 --watch",package.json demo
{
"name": "nestjs-microservices-auth",
"version": "0.0.1",
"description": "",
"author": "",
"private": true,
"license": "UNLICENSED",
"scripts": {
"build": "nest build",
"format": "prettier --write \"apps/**/*.ts\" \"libs/**/*.ts\"",
"start": "nest start",
"start:dev": "nest start --watch",
"start:debug": "nest start --debug 0.0.0.0:9229 --watch",
"start:prod": "node dist/apps/nestjs-microservices-auth/main",
"lint": "eslint \"{src,apps,libs,test}/**/*.ts\" --fix",
"test": "jest",
"test:watch": "jest --watch",
"test:cov": "jest --coverage",
"test:debug": "node --inspect-brk -r tsconfig-paths/register -r ts-node/register node_modules/.bin/jest --runInBand",
"test:e2e": "jest --config ./apps/nestjs-microservices-auth/test/jest-e2e.json"
},
"dependencies": {
"@nestjs/common": "^10.0.0",
"@nestjs/config": "^3.3.0",
"@nestjs/core": "^10.0.0",
"@nestjs/mongoose": "^10.1.0",
"@nestjs/platform-express": "^10.0.0",
"joi": "^17.13.3",
"mongoose": "^8.9.3",
"reflect-metadata": "^0.2.0",
"rxjs": "^7.8.1"
},
"devDependencies": {
"@nestjs/cli": "^10.0.0",
"@nestjs/schematics": "^10.0.0",
"@nestjs/testing": "^10.0.0",
"@types/express": "^5.0.0",
"@types/jest": "^29.5.2",
"@types/node": "^20.3.1",
"@types/supertest": "^6.0.0",
"@typescript-eslint/eslint-plugin": "^8.0.0",
"@typescript-eslint/parser": "^8.0.0",
"eslint": "^8.0.0",
"eslint-config-prettier": "^9.0.0",
"eslint-plugin-prettier": "^5.0.0",
"jest": "^29.5.0",
"prettier": "^3.0.0",
"source-map-support": "^0.5.21",
"supertest": "^7.0.0",
"ts-jest": "^29.1.0",
"ts-loader": "^9.4.3",
"ts-node": "^10.9.1",
"tsconfig-paths": "^4.2.0",
"typescript": "^5.1.3"
},
"jest": {
"moduleFileExtensions": [
"js",
"json",
"ts"
],
"rootDir": ".",
"testRegex": ".*\\.spec\\.ts$",
"transform": {
"^.+\\.(t|j)s$": "ts-jest"
},
"collectCoverageFrom": [
"**/*.(t|j)s"
],
"coverageDirectory": "./coverage",
"testEnvironment": "node",
"roots": [
"<rootDir>/libs/",
"<rootDir>/apps/"
],
"moduleNameMapper": {
"^@app/common(|/.*)$": "<rootDir>/libs/common/src/$1"
}
}
}start the app using docker compose up first
then click debug profile to start attach into the remote app

Nestjs , Docker and Prisma Common Problem when built
Best way to fix prisma common problem with nestjs and docker
nma-auth | PrismaClientInitializationError: Prisma Client could not locate the Query Engine for runtime "debian-openssl-1.1.x".
nma-auth |
nma-auth | This happened because Prisma Client was generated for "debian-openssl-3.0.x", but the actual deployment required "debian-openssl-1.1.x".
nma-auth | Add "debian-openssl-1.1.x" to `binaryTargets` in the "schema.prisma" file and run `prisma generate` after saving it:
nma-auth |
nma-auth | generator client {
nma-auth | provider = "prisma-client-js"
nma-auth | binaryTargets = ["native", "linux-musl-openssl-3.0.x", "debian-openssl-1.1.x"]
nma-auth | }
nma-auth |
nma-auth | The following locations have been searched:
nma-auth | /usr/src/app/node_modules/.prisma/client
nma-auth | /usr/src/app/dist/apps
nma-auth | /home/son/nestjs/nestjs-microservices-auth/apps/auth/node_modules/.prisma/client
nma-auth | /usr/src/app/.prisma/client
nma-auth | /tmp/prisma-engines
nma-auth | at tl (webpack://nestjs-microservices-auth/apps/auth/node_modules/.prisma/client/runtime/library.js:64:758)
nma-auth | at Object.loadLibrary (webpack://nestjs-microservices-auth/apps/auth/node_modules/.prisma/client/runtime/library.js:111:8974)
nma-auth | at _r.loadEngine (webpack://nestjs-microservices-auth/apps/auth/node_modules/.prisma/client/runtime/library.js:112:405)
nma-auth | at _r.instantiateLibrary (webpack://nestjs-microservices-auth/apps/auth/node_modules/.prisma/client/runtime/library.js:111:12308)
nma-auth | at _r.start (webpack://nestjs-microservices-auth/apps/auth/node_modules/.prisma/client/runtime/library.js:112:1965)
nma-auth | at Proxy.onModuleInit (webpack://nestjs-microservices-auth/apps/auth/src/prisma.service.ts:16:9)
nma-auth | at async Promise.all (index 0)
nma-auth | at async callModuleInitHook (/usr/src/app/node_modules/@nestjs/core/hooks/on-module-init.hook.js:43:5)
nma-auth | at async NestApplication.callInitHook (/usr/src/app/node_modules/@nestjs/core/nest-application-context.js:234:13)
nma-auth | at async NestApplication.init (/usr/src/app/node_modules/@nestjs/core/nest-application.js:100:9) {
nma-auth | clientVersion: '6.2.1',
nma-auth | errorCode: undefined
nma-auth | }
nma-auth |
nma-auth | Node.js v21.7.3
nma-auth | No errors found.The solution:
edit the config docker compose file and add the volume to set fixed path on the node modules of the external host ( which is the docker container ):
volumes:
- .:/usr/src/app
- /usr/src/app/node_modules/.prismasee my docker-compose.yaml
services:
auth:
build:
context: .
dockerfile: ./apps/auth/Dockerfile
target: development
command: npm run start:debug auth
container_name: nma-auth
env_file:
- ./apps/auth/.env
ports:
- '3000:3000'
- '9229:9229'
volumes:
- .:/usr/src/app
- /usr/src/app/node_modules/.prismaSimple Image to Text using Langchain, Ollama, LM studio Apis
Mã script này sử dụng các mô hình ngôn ngữ Ollama và OpenAI để thực hiện phân tích hình ảnh và dịch văn bản. Đầu tiên, nó khởi tạo các mô hình với các tham số cụ thể như URL cơ sở và tên mô hình.
Mô hình chính `ChatOllama` được sử dụng để hiểu nội dung của một tệp hình ảnh (`castle.png`) được đọc bất đồng bộ bằng cách sử dụng Node.js's `fs.promises`.
Sau khi phân tích hình ảnh, mô hình `ChatOpenAI` xử lý văn bản được trích xuất. Nó không chỉ thực hiện dịch thuật mà còn xử lý các nhiệm vụ liên quan đến hiểu và tạo ngôn ngữ.
Script xây dựng một thông điệp chứa cả văn bản và dữ liệu hình ảnh. Dữ liệu hình ảnh được mã hóa thành định dạng Base64 để xử lý bởi các mô hình. Sau khi gọi mô hình `ChatOpenAI` với thông điệp đã xây dựng, nó lấy nội dung của hình ảnh dưới dạng văn bản.
Tiếp theo, một mẫu dịch thuật được định nghĩa sử dụng `PromptTemplate` từ `@langchain/core/prompts`. Mẫu này chỉ ra cách dịch văn bản từ một ngôn ngữ sang ngôn ngữ khác, trong trường hợp này từ tiếng Anh sang Tiếng Việt. Nội dung đã dịch được định dạng và sau đó chuyển đến một phiên bản khác của `ChatOllama`, thực hiện việc dịch thuật thực tế.
Thay vì sử dụng URL API từ xa như trước đây, `node module openai` đã thay đổi URL API thành đường dẫn localhost path. Điều này có thể ảnh hưởng đến cách script liên kết với mô hình ngôn ngữ OpenAI.
Cuối cùng, script ghi cả nội dung hình ảnh gốc và bản dịch sang tiếng Việt vào console. Qua quá trình này, script minh họa cách sử dụng các mô hình khác nhau để thực hiện các tác vụ phức tạp như phân tích hình ảnh và dịch văn bản một cách đồng bộ.
import { Ollama } from "@langchain/ollama";
import { ChatOllama } from "@langchain/ollama";
import { HumanMessage } from "@langchain/core/messages";
import { PromptTemplate } from "@langchain/core/prompts";
import { ChatPromptTemplate } from "@langchain/core/prompts";
import fs from "fs/promises";
import { ChatOpenAI, OpenAI } from "@langchain/openai";
const chatModel = new ChatOllama({
baseUrl: "http://ollama.kyluat.zzz:11434", // Default value
model: "llama3.2:1b",
});
const run = async () => {
// from image
const imageData = await fs.readFile("./castle.png");
const chatLMModel = new ChatOpenAI({
baseURL: "http://192.168.1.111:1234/v1", // Default value
apiKey: "sk-proj-asdsd--blabah_weUA",
model: "llava-v1.5-7b",
});
const messages = [
new HumanMessage({
content: [
{
type: "text",
text: `What's in this image?`,
},
{
type: "image_url",
image_url: {
url: "data:image/png;base64," + imageData.toString("base64"),
},
},
],
}),
];
const res = await chatLMModel.invoke(messages);
const imageContent = res.content;
console.log("Image Content: ", imageContent);
// translate to vietnamese
const template =
"You are a helpful assistant that translates {input_language} to {output_language}.";
const humanTemplate = "{text}";
const chatPrompt = ChatPromptTemplate.fromMessages([
["system", template],
["human", humanTemplate],
]);
const multiplePromptResult = await chatPrompt.formatMessages({
input_language: "English",
output_language: "Vietnamese",
text: imageContent,
});
const res2 = await chatModel.invoke(multiplePromptResult);
console.log("Vietnamese: ", res2.content);
};
run();
Install Docker on First Ubuntu
Install Docker apt
# Add Docker's official GPG key:
sudo apt-get update
sudo apt-get install ca-certificates curl
sudo install -m 0755 -d /etc/apt/keyrings
sudo curl -fsSL https://download.docker.com/linux/ubuntu/gpg -o /etc/apt/keyrings/docker.asc
sudo chmod a+r /etc/apt/keyrings/docker.asc
# Add the repository to Apt sources:
echo \
"deb [arch=$(dpkg --print-architecture) signed-by=/etc/apt/keyrings/docker.asc] https://download.docker.com/linux/ubuntu \
$(. /etc/os-release && echo "${UBUNTU_CODENAME:-$VERSION_CODENAME}") stable" | \
sudo tee /etc/apt/sources.list.d/docker.list > /dev/null
sudo apt-get updateInstall Docker packages
sudo apt-get install docker-ce docker-ce-cli containerd.io docker-buildx-plugin docker-compose-pluginConfig sudo docker without sudo command
sudo groupadd docker
sudo usermod -aG docker $USER
newgrp dockerLogout SSH and re-connect
Test
docker run hello-world
Next: Set up the nfs storage
NextJS + NestJS
Tự học nextjs và nestjs as backend.
Shopping App
Mockup Steps to start:
- Code
- Git Repo Shoppy
- Pull Nextjs
- Delete unneccessary files
- Install UI Library of MUI and basic setup of theme
- Header, Navigation, Login Page, Signup Page, Member Page
What is OhMyUsd About?
Intel of Whales Activities and Good Traders' Activities